Kohler KG6208 Naturally Aspirated KG6208TA Turbocharged Propane, Liquefied Petroleum Gas (LPG) Natural Gas (NG) Fueled Engine Overhaul Service Manual (tp7096)
These KG6208 and KG6208TA engines usually sit in standby or prime-power generators, running on propane, LPG, or natural gas in plants, hospitals, and commercial buildings. This overhaul manual is what I’d pull out when an engine has deeper issues—low power, hard starting, or uneven running under load—and I need to prove what’s bad before ordering major parts. For example, if a turbocharged unit is smoking and down on power, this book guides you through the teardown and checks so you can confirm whether it’s a worn top end, valve issue, or a boost-side problem.
Applications & Use Cases
- Trace compression or misfire complaints down to specific cylinders before committing to a full rebuild.
- Follow a logical sequence to strip, inspect, and reassemble the long block without mixing parts or missing fasteners.
- Verify valve train and timing alignment after major work so the engine starts clean and carries load.
- Check and adjust gas-fuel related components after overhaul to avoid lean burn or detonation.
- Confirm wear limits on key components so you know what can be reused and what must be replaced.
FAQ
Q: Can I use this manual on a tablet at the generator site?
A: Yes, it’s practical to keep it on a tablet or laptop so you can zoom in on diagrams while working beside the unit.
Q: Should I still print pages if I have the digital file?
A: Many techs print just the procedures and specs for the job, then mark them up with notes and measurements in the shop.
Safety Note
Always lock out the generator, isolate fuel supply, and let the engine cool fully before starting any overhaul work.
Kohler KG6208 Naturally Aspirated KG6208TA Turbocharged Propane, Liquefied Petroleum Gas (LPG) Natural Gas (NG) Fueled Engine Index:
- Safety Precautions and Instructions
- Introduction
- Service Assistance
- Section 1. Service Views
- 1.1 Naturally Aspirated Engine, Side Views
- 1.2 Naturally Aspirated Engine, Top and Rear Views
- 1.3 Turbocharged, Standard-Duty Engine, Side Views
- 1.4 Turbocharged, Standard-Duty Engine, Top and Rear Views
- Section 2. Repair and Torque Specifications
- 2.1 Repair Specifications
- 2.2 Torque Specifications
- 2.3 Standard Torque Specifications
- Section 3. Mechanical Troubleshooting
- 3.1 Introduction
- 3.2 Engine Misfire Troubleshooting
- 3.3 Engine Compression Test
- 3.4 Cylinder Compression Test
- 3.5 Engine Noise Troubleshooting
- 3.6 Valve Train Troubleshooting
- 3.6.1 General information
- 3.6.2 Valve Train Troubleshooting Chart
- 3.7 Oil Consumption Troubleshooting
- 3.8 Oil Pressure Troubleshooting
- 3.9 Oil Leak Troubleshooting
- 3.10 Marking Disassembled Parts
- 3.11 Care and Cleaning
- 3.12 RTV and Anaerobic Sealer Usage
- 3.13 Tools and Equipment
- Section 4. Engine Disassembly and Assembly
- 4.1 Safety Precautions
- 4.2 Top Dead Center (TDC) on Cylinder 1
- 4.3 ECM and Sensor Installation and Removal
- 4.3.1 Coolant Temperature (CT) Sender
- 4.3.1.1 Removal
- 4.3.1.2 Installation
- 4.3.2 Crankshaft Position (CKP) Sensor
- 4.3.2.1 Removal
- 4.3.2.2 Installation
- 4.3.3 Electronic Control Module (ECM)
- 4.3.3.1 Removal
- 4.3.3.2 Installation
- 4.3.4 Heated Exhaust Gas Oxygen (HEGO) Sensor
- 4.3.4.1 Removal
- 4.3.4.2 Installation
- 4.3.5 Oil Pressure Sender
- 4.3.5.1 Removal
- 4.3.5.2 Installation
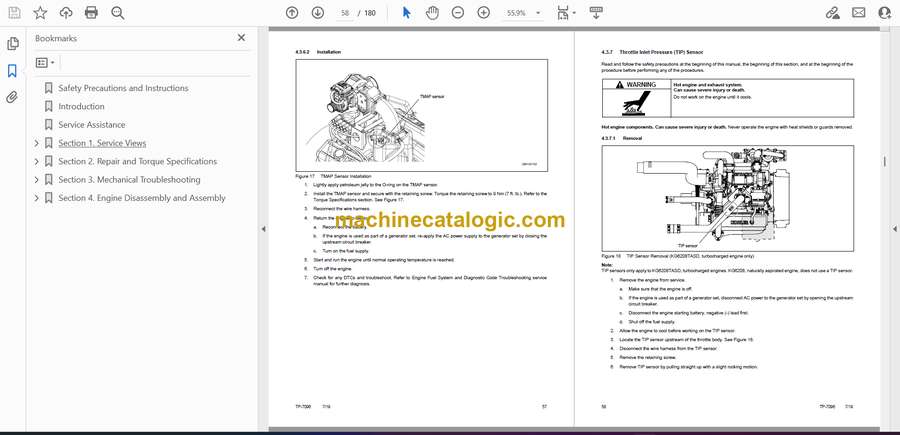
- 4.3.6 Temperature Manifold Pressure (TMAP) Sensor
- 4.3.6.1 Removal
- 4.3.6.2 Installation
- 4.3.7 Throttle Inlet Pressure (TIP) Sensor
- 4.3.7.1 Removal
- 4.3.7.2 Installation
- 4.4 External Components
- 4.4.1 Air Intake and Ignition Systems (KG6208, naturally aspirated engine)
- 4.4.1.1 Direct-Acting Electronic Pressure Regulator (DEPR)
- 4.4.1.1.1 Removal
- 4.4.1.1.2 Inspection
- 4.4.1.1.3 Installation
- 4.4.1.2 Air-Fuel Mixer and Throttle Body
- 4.4.1.2.1 Removal
- 4.4.1.2.2 Installation
- 4.4.1.3 Throttle Body and Adapter
- 4.4.1.3.1 Removal
- 4.4.1.3.2 Inspection
- 4.4.1.3.3 Installation
- 4.4.1.4 Intake Mounting Bracket
- 4.4.1.4.1 Removal
- 4.4.1.4.2 Installation
- 4.4.1.5 Intake Manifold Elbow
- 4.4.1.5.1 Removal
- 4.4.1.5.2 Installation
- 4.4.1.6 Ignition Coil
- 4.4.1.6.1 Removal
- 4.4.1.6.2 Installation
- 4.4.1.7 Distributor
- 4.4.1.7.1 Removal
- 4.4.1.7.2 Installation
- 4.4.2 Air Intake and Ignition Systems (KG6208TASD, turbocharged engine)
- 4.4.2.1 Direct-Acting Electronic Pressure Regulator (DEPR)
- 4.4.2.1.1 Removal
- 4.4.2.1.2 Inspection
- 4.4.2.1.3 Installation
- 4.4.2.2 Air-Fuel Mixer
- 4.4.2.2.1 Removal
- 4.4.2.2.2 Installation
- 4.4.2.3 Turbocharger
- 4.4.2.3.1 Removal
- 4.4.2.3.2 Installation
- 4.4.2.4 Intake Mounting Bracket
- 4.4.2.4.1 Removal
- 4.4.2.4.2 Installation
- 4.4.2.5 Throttle Body
- 4.4.2.5.1 Removal
- 4.4.2.5.2 Installation
- 4.4.2.6 Ignition Coil Pack
- 4.4.2.6.1 Removal
- 4.4.2.6.2 Installation
- 4.4.2.7 Oil Pump Drive
- 4.4.2.7.1 Removal
- 4.4.2.7.2 Installation
- 4.4.3 Drive Belt
- 4.4.4 Oil Filter
- 4.4.5 Engine starter
- 4.4.5.1 Removal
- 4.4.5.2 Installation
- 4.4.6 Flywheel
- 4.4.6.1 Removal
- 4.4.6.2 Installation
- 4.4.7 Flywheel Housing
- 4.4.7.1 Removal
- 4.4.7.2 Installation
- 4.4.8 Fan Assembly
- 4.4.8.1 Removal
- 4.4.8.2 Installation
- 4.4.9 Tensioner
- 4.4.9.1 Removal
- 4.4.9.2 Installation
- 4.4.10 Battery Charging Alternator
- 4.4.10.1 Removal
- 4.4.10.2 Inspection
- 4.4.10.3 Installation
- 4.4.11 Water Pump
- 4.4.11.1 Removal
- 4.4.11.2 Inspection
- 4.4.11.3 Installation
- 4.4.12 Thermostat
- 4.4.12.1 Removal
- 4.4.12.2 Installation
- 4.4.13 Spark Plugs
- 4.4.14 Exhaust Crossover Pipe
- 4.4.14.1 Removal
- 4.4.14.2 Installation
- 4.4.15 Exhaust Manifold
- 4.4.15.1 Removal
- 4.4.15.2 Installation
- 4.4.16 Intake Manifold
- 4.4.16.1 Removal
- 4.4.16.2 Installation
- 4.4.17 Oil Dip Stick Tube
- 4.4.17.1 Removal
- 4.4.17.2 Installation
- 4.4.18 Oil Pan
- 4.4.18.1 Removal
- 4.4.18.2 Installation
- 4.4.19 Crankshaft Pulley
- 4.4.19.1 Removal
- 4.4.19.2 Installation
- 4.4.20 Harmonic Balancer
- 4.4.20.1 Removal
- 4.4.20.2 Installation
- 4.4.21 Timing (Front) Cover and Crankshaft Position Sensor
- 4.4.21.1 Removal
- 4.4.21.2 Installation
- 4.4.22 Camshaft Sprocket and Timing Chain
- 4.4.22.1 Removal
- 4.4.22.2 Installation
- 4.4.23 Crankshaft Sprocket
- 4.4.23.1 Removal
- 4.4.23.2 Installation
- 4.4.24 Valve Covers
- 4.4.24.1 Removal
- 4.4.24.2 Installation
- 4.4.25 Cylinder Head
- 4.4.25.1 Removal
- 4.4.25.2 Inspection
- 4.4.25.3 Installation
- 4.4.26 Rocker Arms and Pushrods
- 4.4.26.1 Removal
- 4.4.26.2 Installation
- 4.4.27 Valves
- 4.4.27.1 Removal
- 4.4.27.2 Inspection
- 4.4.27.3 Valve Spring Inspection
- 4.4.27.4 Installation
- 4.4.28 Valve Lash Adjustment
- 4.5 Engine Block
- 4.5.1 Lifters
- 4.5.1.1 Removal
- 4.5.1.2 Installation
- 4.5.2 Camshaft
- 4.5.2.1 Removal
- 4.5.2.2 Inspection
- 4.5.2.3 Installation
- 4.5.3 Oil Cooler Adapter
- 4.5.3.1 Removal
- 4.5.3.2 Installation
- 4.5.4 Oil Filter Adapter
- 4.5.4.1 Removal
- 4.5.4.2 Installation
- 4.5.5 Windage Tray
- 4.5.5.1 Removal
- 4.5.5.2 Installation
- 4.5.6 Oil Pump
- 4.5.6.1 Removal
- 4.5.6.2 Installation
- 4.5.7 Pistons
- 4.5.7.1 Removal
- 4.5.7.2 Check Piston Ring Gap
- 4.5.7.3 Check Piston Ring Grooves
- 4.5.7.4 Clean Pistons
- 4.5.7.5 Installation
- 4.5.8 Rear Seal
- 4.5.8.1 Removal
- 4.5.8.2 Installation
- 4.5.9 Crankshaft
- 4.5.9.1 Remove
- 4.5.9.2 Inspection
- 4.5.9.3 Installation
- 4.5.10 Camshaft Bearing Removal
- 4.5.10.1 Inspection
- 4.5.10.2 Removal
- 4.5.10.3 Installation
- 4.5.11 Expansion (Freeze) Plugs
- 4.5.11.1 Removal
- 4.5.11.2 Installation
- 4.5.12 Pipe Plugs
- 4.5.12.1 Removal
- 4.5.12.2 Installation
- 4.5.13 Engine Block Inspection
- 4.5.13.1 Check Cylinder Taper and Disassemble Cylinder Block
Kohler


