Develon DX20ZE Mini Excavator Operation and Maintenance Manual (950106-03150B-EN) (1000 and Up)
On a DX20ZE you’re usually working tight sites—driveways, backyards, small utility trenches—where you can’t afford downtime or surprises. This operation and maintenance manual helps you set a rhythm: what to trace, check, and verify before you start, what to inspect weekly, and what to service when hours stack up so the machine stays predictable. Picture this: you’re in peak season, machine won’t power up right, and instead of guessing, you walk through the manual’s steps to isolate a simple interlock issue and you’re back digging before lunch.
Applications & Use Cases
- Set up a daily walk‑around so you check tracks, hoses, pins, and fluids the same way every morning.
- Follow the periodic service charts to decide when to change filters, bleed hydraulic lines, and test safety systems.
- Trace electrical faults logically instead of just swapping parts, using the manual’s sequences to verify each circuit.
- Align and route new hoses or attachments so they don’t rub, kink, or snag while you swing and boom.
- Plan downtime in slow periods by grouping 250‑, 500‑hour type services instead of getting hit mid‑job.
FAQ
Q: Is this a PDF I can search on my laptop or tablet?
A: Yes, it’s typically a searchable PDF, so you can jump to sections by keywords instead of flipping around.
Q: Can I print just a few pages to keep in the cab?
A: You usually can; most folks print the daily checks, lubrication chart, and basic troubleshooting to keep on hand.
Safety Note
Always lock out, lower the attachment, and test that the machine won’t move before you crawl under it to inspect or service anything.
Develon DX20ZE Mini Excavator Index:
- DX20ZE
- Revision
- Foreword
- Intended Use
- Machine capacity
- Attachment
- Product Identification Number (PIN)
- Component Serial Numbers
- Machine Serial Numbers
- Safety Messages
- EC Declaration of Conformity
- UK DECLARATION OF CONFORMITY
- Regulation (EU) 2017/654 Annex XV
- Engine Operation and Maintenance
- Malfunctions & Inducement
- DEVELON Fleet Management System General Information and Privacy Notice
- Safety
- Safety Decals
- Safety Decals – Information and Location
- General
- Operator’s Responsibility – Safe Operation
- Know Your Machine
- Proper Work Tools and Attachments
- Pressurized Fluids
- Flying or Falling Objects
- Personal Protective Equipment (PPE)
- Correction of Machine Problems
- Crushing and Cutting
- Hot Coolant and Oils – Burn Prevention
- Fire and Explosion Prevention
- Fire Extinguisher and First-aid Kit (Emergency Medical Kit)
- Electrical System and Electrical Shock
- Tip-over Protective Structure (TOPS)
- Excavator Prohibition of Lifting Warning
- Transportation
- Obey State and Local Over-the-Road Regulations
- Loading and Unloading
- Transporting Machine
- Operation
- Before Engine Starting
- Work Site
- Mounting/Dismounting
- Cleaning
- Operator Station
- Seat Belt
- Starting Engine
- Swinging or Traveling
- Lifting and Digging
- Operation on Slopes
- Towing
- Attachment
- Equipment Lowering with Engine Stopped
- Parking Machine
- Long Term Storage
- Maintenance
- “DO NOT OPERATE” warning tag
- Inspection or Cleaning before Maintenance
- Use of Proper Tools
- Disassembling Precautions
- Use of Lighting
- Fire and Explosion Prevention
- Burn Prevention
- Rubber That Contains Fluorides
- Rubber and Plastics
- Warning for Counterweight and Front Attachment Removal
- Lock Inspection Covers
- Compressed Air
- Track Tension Adjustments
- Maintenance of the Underside
- High-pressure Lines, Tubes and Hoses
- Battery (12V)
- Environment and Circumstances
- Work Site Areas Requiring Extra Caution
- High-voltage Cables
- Underground Operation
- Working in Water
- Working in Contaminated Environment
- Operation in Extreme Conditions
- Asbestos Information
- Silica Dust Information
- Disposal of Hazardous Materials
- Sound
- Vibration Information
- Operating Controls
- Component Locations
- Operator’s Area
- Operational Controls and Panels
- 1. Horn Switch (Left-hand Work Lever)
- 2. Auto Sleep Switch, Quick Coupler Operating Switch
- 3. Display Monitor
- 4. 12V Power Socket
- 5. Travel Speed Selector Switch
- 6. Quick Coupler Selector Switch
- 7. Engine Speed Control Dial
- 8. Engine Start Switch
- 9. Keypad
- 10. Hour Meter
- 11. Safety Lever
- Display Monitor
- Functional Check
- Setting a Password
- 1. Digital Clock
- 2. Indicator Display
- 3. Hydraulic Oil Temperature Gauge
- 4. Power Pack Battery Gauge
- 5. Tachometer
- 6. Mode Symbol Display
- 7. Menu/ESC Button
- 8. Selector Button
- 9. Down Arrow Button
- 10. Home Button
- 11. Up Arrow Button
- 12. Power Mode Indicator
- 13. Display Warning Symbols
- Warning Pop-Up Messages
- User Menu
- User Menu – Access and Escape Methods
- Miscellaneous Electrical Devices
- Seat Adjustment
- 1. Forward/Backward Adjustment
- 2. Reclining Position Adjustment
- Seat Belt
- Seat Belt Locking and Unlocking
- Emergency Stop Switch
- Miscellaneous Convenience Devices
- Miscellaneous Access Covers and Doors
- Operation
- To Operate a New Excavator
- Starting and Stopping Engine
- Checks Before Starting Engine
- Operational Checks Before Starting Engine
- Warm-up Operation
- Warm-up Operation in Cold Weather
- Stopping Engine
- Checks and Maintenance After Stopping Engine
- Safety Lever
- Travel
- Automatic Travel Speed Control
- Travel Control Lever Operation
- General Travel Instructions
- Operating Instructions
- Work Levers (Joysticks)
- Dozer Blade Control Lever
- Track Extension Control Lever
- Boom Swing Pedal
- Charging System
- Slow Charging
- Fast Charging
- Operating Precautions
- Working in Water
- Escaping From Mud
- Parking Excavator
- Towing Procedure
- Attachment
- Bucket – Replace and Reverse
- Replace
- Reverse (If Applicable)
- Quick Coupler Operation
- Breaker Operation
- Shear Operation
- Operation in Extreme Conditions
- Operation In Extreme Cold
- Operation in Extreme Heat
- Operation In Dusty and Sandy Areas
- Operation in Rainy or Humid Conditions
- Operation in Saltwater Areas
- Operation During Electrical Storms
- Long Term Storage
- Before Storage
- During Storage
- After Storage
- Road Liners (Machine Equipped with Road Liner)
- Road Liners Information
- Warranty for Road Liners
- Using Road Liners
- Inspection, Maintenance and Adjustment
- Maintenance
- Machine Setup Position for Maintenance
- Maintenance Handling Access
- Entering/Leaving/Climbing On Machine
- Handling Oil
- Oil
- Lubricants
- Grease (Front Joint Pin)
- Filters
- Fluid Capacities
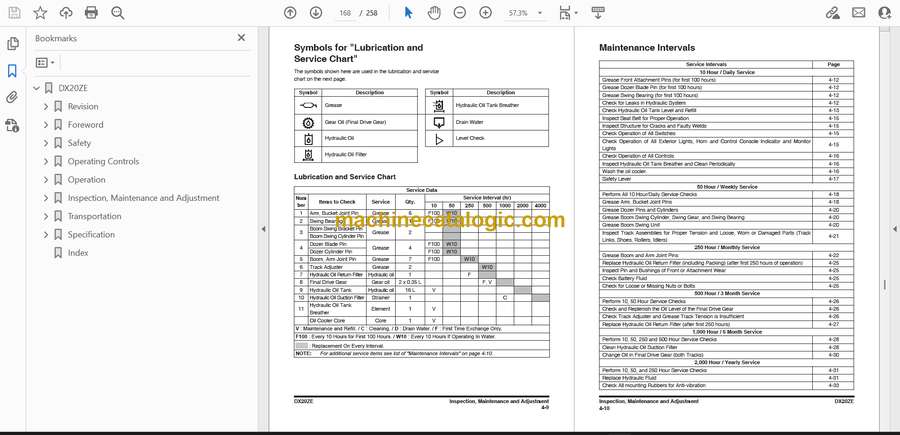
- Symbols for “Lubrication and Service Chart”
- Lubrication and Service Chart
- Maintenance Intervals
- 10 Hour / Daily Service
- Grease Front Attachment Pins (for first 100 hours)
- Grease Dozer Blade Pin (for first 100 hours)
- Grease Swing Bearing (for first 100 hours)
- Check for Leaks in Hydraulic System
- Check Hydraulic Oil Tank Level and Refill
- Inspect Seat Belt for Proper Operation
- Inspect Structure for Cracks and Faulty Welds
- Check Operation of All Switches
- Check Operation of All Exterior Lights, Horn and Control Console Indicator and Monitor Lights
- Check Operation of All Controls
- Inspect Hydraulic Oil Tank Breather and Clean Periodically
- Wash the oil cooler.
- Safety Lever
- 50 Hour / Weekly Service
- Perform All 10 Hour/Daily Service Checks
- Grease Arm, Bucket Joint Pins
- Grease Dozer Pins and Cylinders
- Grease Boom Swing Cylinder, Swing Gear, and Swing Bearing
- Grease Boom Swing Unit
- Inspect Track Assemblies for Proper Tension and Loose, Worn or Damaged Parts (Track Links, Shoes, Rollers, Idlers)
- 250 Hour / Monthly Service
- Grease Boom and Arm Joint Pins
- Replace Hydraulic Oil Return Filter (including Packing) (after first 250 hours of operation)
- Inspect Pin and Bushings of Front or Attachment Wear
- Check Battery Fluid
- Check for Loose or Missing Nuts or Bolts
- 500 Hour / 3 Month Service
- Perform 10, 50 Hour Service Checks
- Check and Replenish the Oil Level of the Final Drive Gear
- Check Track Adjuster and Grease Track Tension is Insufficient
- Replace Hydraulic Oil Return Filter (after first 250 hours)
- 1,000 Hour / 6 Month Service
- Perform 10, 50, 250 and 500 Hour Service Checks
- Clean Hydraulic Oil Suction Filter
- Change Oil in Final Drive Gear (both Tracks)
- 2,000 Hour / Yearly Service
- Perform 10, 50, and 250 Hour Service Checks
- Replace Hydraulic Fluid
- Check All mounting Rubbers for Anti- vibration
- Check Periodic Inspection Items and Record Results
- Check for Crack in Machine Structure and Damage to Weld Lines
- 4,000 Hour / 2 Year Service
- Replace Major Parts Periodically
- 12,000 Hour / 6 Year Service
- Hose In-service Lifetime Limit
- Bucket
- Replace Bucket Tooth Points
- Replace Bucket
- Replace Bucket O-ring
- Bucket Shim Assembly Procedure
- Track Tension
- Venting and Priming Hydraulic System
- Venting Main Pump
- Venting Cylinders
- Venting Travel Motor
- Venting Swing Motor
- Operation
- Electrical System
- Maintenance in Special Conditions
- Transportation
- Loading and Unloading
- Warning when Removing Counterweight / Canopy / Front
- Lifting Machine
- Specification
- Standard Specification
- Overall Dimensions
- Digging Force
- Working Range
- Excavator Rated Lift Capacity Tables
- Approximate Weight of Workload Materials
- Index
Develon


