$ 0
0
$ 0
0

Normet Spraymec SF050 D Technical Information (5F85BCA_1000)

Format: PDF (Printable Document)

File Language: English

File Pages: 1043

File Size: 56.19 MB (Speed Download Link)
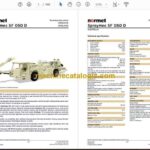
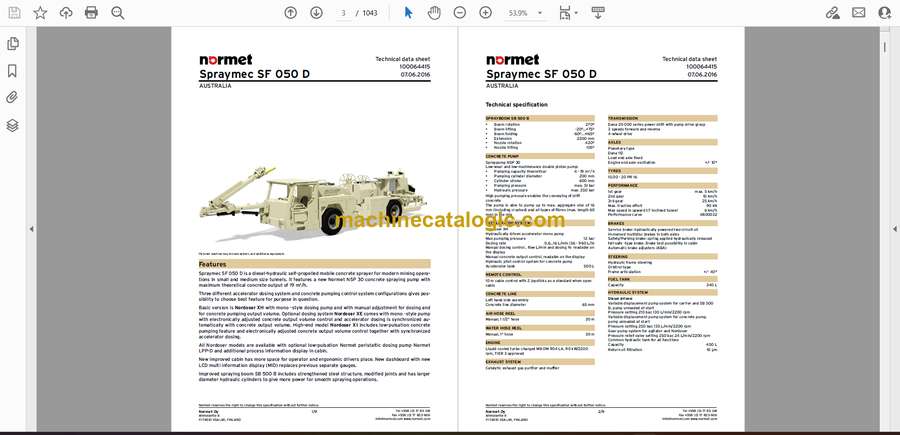
Brand: Normet

Model: Spraymec SF050 D

Book No: 5F85BCA_1000

Type of Document: Technical Information

Categories: ,

$ 55

Share:

Normet Spraymec SF050 D Technical Information (5F85BCA_1000)

Normet Spraymec SF050 D Technical Information (5F85BCA_1000)

📘 Show Index

Normet Spraymec SF050 D Technical Information (5F85BCA_1000) Index:

  • 0. Contents
  • 0. Carrier
  • 1. TDS Spraymec SF 050 D 100064415 Australia
  • 1.1. FOPS_ROPS conformance certificate
  • 1.2 Wheels (Q01,03,07,08,09,12,14,16,17,19,21,23,25,27,29,30,32,34,37,38,39,40,42,43,44,45,47,49,50,51,52) GKN drawing N20S4441
  • 1.3 Wheels Q02,04,05,06,10,11,13,15,18,20,22,24,26,28,31,33,35,36,41,46,48) GKN drawing N20S441
  • 2. Operator’s Manual EH195
    • Spraymec SF 050 D
    • Contents
    • 1. Introduction
      • 1.1. Carrier
      • 1.2. Carrier identification
      • 1.3. Frame structure
        • 1.3.1. Engine end frame
        • 1.3.2. Load end frame
        • 1.3.3. Oscillation
      • 1.4. Engine
        • 1.4.1. General
        • 1.4.2. Exhaust system
      • 1.5. Hydrodynamic transmission
        • 1.5.1. General
        • 1.5.2. Torque converter
        • 1.5.3. Transmission
        • 1.5.4. Transmission controls
      • 1.6. Mechanical transmission
        • 1.6.1. General
        • 1.6.2. Driveshafts
        • 1.6.3. Axle assemblies
      • 1.7. Hydraulics
        • 1.7.1. Pumps
        • 1.7.2. Brakes
        • 1.7.3. Steering
    • 2. Safety rules
      • 2.1. General safety rules
      • 2.2. Operating safety rules
      • 2.3. Label locations
    • 3. Operator controls
      • 3.1. Dashboard
        • 3.1.1. TB7
        • 3.1.2. TB7b
        • 3.1.3. Norsmart control system.
        • 3.1.4. Automatic Brake Application system
        • 3.1.5. Engine control system
      • 3.2. Remote control box
      • 3.3. CDC console
      • 3.4. TB5
      • 3.5. Main switch
        • 3.5.1. Service switch
        • 3.5.2. Starter isolator
      • 3.6. Circuit breakers
      • 3.7. Driving controls
      • 3.8. Seat
      • 3.9. Emergency stop
      • 3.10. Pressure gauge kit
      • 3.11. Specific features
    • 4. Operation and use
      • 4.1. Commissioning on delivery
      • 4.2. Daily operation
        • 4.2.1. Daily maintenance operations
        • 4.2.2. Instrumentation checks
        • 4.2.3. Testing the brakes
      • 4.3. Driving the carrier
        • 4.3.1. General
        • 4.3.2. Before start
        • 4.3.3. Engine Start
        • 4.3.4. Gear shifting
        • 4.3.5. Steering
        • 4.3.6. Setting the carrier in motion
        • 4.3.7. Driving on slopes
        • 4.3.8. Road driving
        • 4.3.9. Stopping
      • 4.4. Carrier transfer
        • 4.4.1. Towing
        • 4.4.2. Lifting
        • 4.4.3. Lowering the carrier down a mine
      • 4.5. Special operating conditions
        • 4.5.1. Winter operation
        • 4.5.2. High ambient temperature, high altitude
        • 4.5.3. Jump start
        • 4.5.4. Cleaning protective treatment
    • Notes
  • 3. Service Schedule 25.5.2020 EN
  • 3.1 Filling capacities and classifications EN 2_2021
  • 4. Maintenance Manual EH195
    • Spraymec SF 050 D
    • Contents
    • 1. Safety precautions
      • 1.1. Service
      • 1.2. Hydraulics
      • 1.3. Other precautions
    • 2. Oil samples
      • 2.1. Evacuation and sample line operation
      • 2.2. Sample lines
    • 3. Engine
      • 3.1. Lubricant recommendations
        • 3.1.1. Service products
        • 3.1.2. Diesel Fuels
        • 3.1.3. Fame fuels
        • 3.1.4. Engine oils
        • 3.1.5. Coolant
      • 3.2. General
      • 3.3. Procedures
        • 3.3.1. Daily or once per shift (10 h)
          • Check the engine oil level.
          • Check the fuel level.
          • Check the air cleaner.
          • Check the coolant level.
          • Check the fuel pre-filter
        • 3.3.2. Every 500 hours
          • Replace the engine oil filter.
          • Change the engine oil.
          • Check the battery and clean battery terminals.
          • Check the coolant additive concentration.
          • Clean catalytic exhaust gas purifier.
          • Check the poly -V-belt condition.
          • Adjust the valve clearance.*
        • 3.3.3. Every 1000 hours
          • Check the engine.
          • Check the lines and hoses.
          • Check the air cleaner intake pipe.
          • Replace the intake air cleaner filter.
          • Check the cooling and heating system.
        • 3.3.4. Every 1500 hours
          • Adjust the valve clearance.
          • Replace the fuel filter element.
          • Clean the fuel prefilter element. (OM904LA engine)
          • Replace the fuel pre-filter insert.
          • Change the coolant.
        • 3.3.5. Every 2 years
          • Replace compressed air dryer filter cartridge.
      • 3.4. Troubleshooting
    • 4. Powershift transmission
      • 4.1. Lubricant recommendations
      • 4.2. Procedures
        • 4.2.1. Daily or once per shift (10 hours)
          • Check the transmission oil level.
        • 4.2.2. Every 500 hours
          • Replace the transmission oil filter.
        • 4.2.3. Every 1000 hours
          • Change the transmission oil.
      • 4.3. Troubleshooting
        • 4.3.1. General
        • 4.3.2. Procedures
        • 4.3.3. Troubleshooting guide
    • 5. Mechanical transmission
      • 5.1. Lubricant Recommendations
      • 5.2. Procedures
        • 5.2.1. Daily or once per shift (10 hours)
          • Check the tyres visually.
        • 5.2.2. Weekly (50 hours)
          • Lubricate the propeller shaft greasing fittings.
          • Check tyre pressure and condition.
          • Check the drive line bolts.
        • 5.2.3. Every 125 hours
          • Check the axle differential oil level.
        • 5.2.4. Every 250 hours
          • Check the wheel nuts.
          • Check the axle planetary gear oil level.
        • 5.2.5. Every 500 hours
          • Check the brake plate wear.
          • Change the axle differential oil.
          • Adjust the safety/parking brake.
        • 5.2.6. Every 1000 hours
          • Change the axle planetary gear oil.
        • 5.2.7. As required
          • Air bleed the service brakes.
          • Air bleed the safety/parking brakes.
      • 5.3. Troubleshooting
    • 6. Hydraulic system
      • 6.1. Lubricant recommendations
      • 6.2. Pressure accumulator safety precautions
      • 6.3. Procedures
        • 6.3.1. Daily or once per shift (10 hours)
          • Check the hydraulic fluid level.
          • Check there are no leaking or hanging hoses.
        • 6.3.2. Every 500 hours
          • Check the pressure accumulators
          • Replace the hydraulic return fluid filter.
          • Change the hydraulic low pressure filter MFX.
          • Change the hydraulic fluid.
        • 6.3.3. Every 1000 hours
          • Accumulator gas pressure test.
        • 6.3.4. As required maintenance
          • Check the steering hydraulic pressure.
          • Check and adjust the charging pressure.
          • Check the service brake pressure.
          • Check and adjust the safety/parking brake pressure.
      • 6.4. Troubleshooting
        • 6.4.1. Steering
        • 6.4.2. Service brakes
        • 6.4.3. Safety/parking brakes
    • 7. Frame
      • 7.1. Lubricant recommendations
      • 7.2. Procedures
        • 7.2.1. Weekly (50 hours)
          • Lubricate the carrier greasing fittings.
        • 7.2.2. Every 1000 hours
          • Check the oscillation axle bushings.
          • Check the frame joint bearings.
          • Check the steering cylinder joint pin, pin locking and bearing.
    • 8. Tightening torques
      • 8.1. Screws
      • 8.2. Screws with locking washers
        • 8.2.1. Wedge lock washers (e.g. Wurth®, HEICO®)
        • 8.2.2. Nord-lock® Steel washers
  • 5. Safety Instructions
    • Normet Carriers and Equipments
    • Contents
    • 1. Foreword
    • 2. Safety Instructions in Manuals
      • 2.1. Operator manual
    • 3. Instructions and Warnings
    • 4. General Safety Instructions
    • 5. Instructions for the Owner and Operator
      • 5.1. Working environment
      • 5.2. Personnel
      • 5.3. Distribution of liability
      • 5.4. Training
    • 6. Operator Suitability and Responsibility
      • 6.1. Suitability
      • 6.2. Responsibility
    • 7. Maintaining Safety
    • 8. Carrier
      • 8.1. Prior to operation
      • 8.2. Starting up
      • 8.3. Driving
      • 8.4. Operation
      • 8.5. Ending of shift
      • 8.6. Stopping
      • 8.7. Towage
      • 8.8. Diesel engine
      • 8.9. Transport
      • 8.10. Service of batteries
    • 9. Mobile Elevating Work Platform
      • 9.1. Safety Instructions For Lifting Platform Operation
    • 10. Lifting Cargo
      • 10.1. Taking The Lifter Into Use
      • 10.2. Instructions For Safe Lifting
      • 10.3. Lifting
    • 11. Concrete Spraying
      • 11.1. General
      • 11.2. Pump and boom
      • 11.3. Operating
      • 11.4. Cleaning
    • 12. Anfo Charging
      • 12.1. General
      • 12.2. Instructions
      • 12.3. Explosives
      • 12.4. Work
      • 12.5. Hot work
      • 12.6. Fire prevention
    • 13. Emulsion Charging
      • 13.1. General instructions
    • 14. Electric System
      • 14.1. Electric circuit
      • 14.2. Electric lines
      • 14.3. Contact with an electric line
      • 14.4. In case of bodily injury
      • 14.5. Service of electric equipment
      • 14.6. Cable reel and AC grid
    • 15. Hydraulic System
    • 16. Compressed Air and Water Systems
    • 17. Maintenance and Service
      • 17.1. General
      • 17.2. Carrier
      • 17.3. Engine
      • 17.4. Oils and greases
      • 17.5. Adding fuel
      • 17.6. Safety Instructions for Servicing the Booms
      • 17.7. Safety Instructions For Servicing The Lifting Platform
      • 17.8. Welding
    • 18. Environmental Instructions
      • 18.1. Introduction
      • 18.2. Fuels
      • 18.3. Oils and oily waste
      • 18.4. Coolants
      • 18.5. Cleaning solutions
      • 18.6. Rubber
      • 18.7. Batteries
      • 18.8. Metals
      • 18.9. Worn components
      • 18.10. Disposing the Normet product
  • 6. CPC4 fault codes
    • 8. Diagnostics
      • 8.1. J1939 Diagnostic Messages
      • 8.2. Fault Codes
        • 8.2.1. Conversion Method
        • 8.2.2. Fault Codes for CPC4-ECAN and MR2
      • 8.3. Actual Values
        • 8.3.1. Analog Values
  • 0. Spraying
  • 1. Spraying boom SB 500 B Rev 5
    • Spraying Boom SB 500 B
    • Contents
    • 1. Foreword
    • 2. Introduction
      • 2.1. Technical Information SB 500 B
      • 2.2. SB 500 B Boom System
        • 2.2.1. Description
        • 2.2.2. Hydraulics
        • 2.2.3. System control
    • 3. Safety instructions
      • 3.1. General
      • 3.2. Boom Operation
      • 3.3. Boom Maintenance
      • 3.4. In case of danger
      • 3.5. Working Environment
    • 4. Operation
      • 4.1. Before Operation of the Boom
      • 4.2. Boom Handling
      • 4.3. Storage
      • 4.4. Extreme Conditions
    • 5. Maintenance
      • 5.1. Lubricant recommendations
      • 5.2. Schedule
      • 5.3. Maintenance Procedures
        • 5.3.1. Daily or once per shift (10 hours)
          • Lubricate the nozzle’s swivel joints.
          • Wash the boom.
          • Lubricate the telescope extension.
          • Visually check the hydraulic hoses, couplings and the boom.
          • Check the joint pins, pin locking and bearing if the boom hits an obstacle.
        • 5.3.2. Weekly (50 hours)
          • Lubricate the spraying boom fittings.
          • Check the oil level in the boom rotation gear.
          • Check the oil level in the fail safe brake.
          • Check the oil level in the nozzle head rotation motor.
          • Inspect the boom attachment to the carrier frame.
        • 5.3.3. Every 500 hours
          • Change the boom rotation gear oil.
          • Change the fail safe brake oil.
          • Check the pressures.
          • Inspect the turning joint lug welding.
          • Inspect the condition of the boom beams.
          • Inspect the boom attachment bolt connections.
          • Inspect the nozzle head rotation motor bolt connections.
          • Check the thickness of the slide pads.
        • 5.3.4. Every 1000 hours
          • Change the nozzle head rotation motor oil.
  • 2. Concrete pump NSP30-40
    • Concrete pump NSP30/NSP40
    • Contents
    • 1. Introduction
      • 1.1. Technical data
    • 2. Safety precautions
      • 2.1. Service
      • 2.2. Hydraulics
    • 3. Maintenance
      • 3.1. Lubricant recommendations
      • 3.2. Schedule
      • 3.3. Maintenance procedures
        • 3.3.1. Daily or once per shift (10 hours)
          • Lubricate the pump fittings.
          • Check the hydraulic system for wear and leaks.
          • Check the tension of the stud bolts.
          • Check the tightness of the cutting ring.
          • Check the water level in the water box.
          • Wash the spraying pump.
        • 3.3.2. Weekly (50 hours)
          • Check the condition of the grill sensor.
          • Check the condition of the cutting ring.
        • 3.3.3. Every 125 hours
          • Check the condition of the delivery pistons.
          • Check the condition of the wear plate.
          • Check the condition of the agitator shaft.
          • Check the condition of the grill supports.
          • Check the condition of the seals.
          • Check the condition of the swivel cylinder pins and bearings.
          • Clean the gate valve.
        • 3.3.4. Every 250 hours
          • Check the tightening torque of the bearing housing bolts.
        • 3.3.5. Every 500 hours
          • Check the condition of the delivery cylinders.
          • Check the condition of the outlet tube.
          • Check the condition of the swivel lever.
          • Check the condition of the bronze bushing.
        • 3.3.6. Every 1000 hours
          • Accumulator gas pressure test.
    • 4. Repairs
      • 4.1. Switching overlap
      • 4.2. Delivery piston change
  • 3. Spraying equipment EH195
    • Spraying Equipment
    • Contents
    • 1. Introduction
      • 1.1. Technical description
        • 1.1.1. Wet mix process
        • 1.1.2. Pumped concrete
        • 1.1.3. Accelerators
        • 1.1.4. Concrete pump
        • 1.1.5. Boom
    • 2. Controls
      • 2.1. Waterline
        • 2.1.1. Shut-off valves for water
        • 2.1.2. Water pressure regulator
        • 2.1.3. Water box emptying valve
        • 2.1.4. Water reel
        • 2.1.5. Boots washing
        • 2.1.6. Pressure washer
        • 2.1.7. High pressure wall washing system
      • 2.2. Pressure air line
        • 2.2.1. Shut -off valves for compressed air
        • 2.2.2. Compressed air hose reel
      • 2.3. Concrete pump controls
        • 2.3.1. Gauges
        • 2.3.2. Control system by-pass
      • 2.4. Changing the linear sensor system to pressure sensor mode
    • 3. Operation and use
      • 3.1. Concrete pumping
      • 3.2. Useful tips
      • 3.3. Spraying technique
    • 4. Maintenance
      • 4.1. Schedule
      • 4.2. Maintenance procedures
        • 4.2.1. Daily or once per shift (10 hours)
          • Visually check the delivery line.
        • 4.2.2. After use
          • Wash the delivery line.
          • Wash the spraying nozzle.
          • Wash the spraying unit.
          • Lubricate the spraying unit.
        • 4.2.3. As required
          • Flush the inline strainer screen.
          • Fill the accelerator reservoir.
          • Fill up the form oil reservoir.
          • Wash the accelerator pump.
          • Air bleed the accelerator pump.
    • 5. Water line filter maintenance
      • 5.1. Schedule
      • 5.2. Maintenance procedures
        • 5.2.1. Every 500 hours
          • Replace the filters in the water line.
  • 4. Accelerator pump LPP-D
  • 5. NORSMART NORDOSER NGE2 XE XH XI CONTROL SYSTEM USER INTERFACE MANUAL V.1.26 231220, EN
    • NORSMART NORDOSER NGE2 XE/XH/XI
    • 1. GENERAL
      • 1.1. Purpose of the system
      • 1.2. Warnings and notifications
      • 1.3. Definitions, terms and abbreviations used
    • 2. General description of the system
      • 2.1. Multi Information Display (MID)
    • 3. User Interface
      • 3.1. Navigation in the user interface
      • 3.2. Adjusting values
      • 3.3. Access rights of the user interface
      • 3.4. Pop-up windows of the user interface
      • 3.5. User interface alerts
      • 3.6. Drive display (1)
      • 3.7. Process Display (2)
      • 3.8. Shift information (3)
        • 3.8.1. Edit shift information (3.1)
        • 3.8.2. Process settings (3.2)
        • 3.8.3. Close shift (3.3)
        • 3.8.4. Condition monitoring settings (3.4) (Only XI control systems)
      • 3.9. SmartSpray Teach Mode pop up
      • 3.10. Data logging (4)
        • 3.10.1. Process log window (4.1)
        • 3.10.2. Alerts window (4.2)
        • 3.10.3. Platform operating hours (4.3)
        • 3.10.4. File transfer settings (4.4) (Commercial option)
      • 3.11. Display settings window (5)
      • 3.12. Advanced settings window (6)
        • 3.12.1. Access level selection (6.1)
        • 3.12.2. Commercial options (6.2)
        • 3.12.3. Factory & default parameters (6.3)
        • 3.12.4. System versions and settings (6.4)
        • 3.12.5. System backup (6.5)
      • 3.13. Process maintenance window (7)
        • 3.13.1. Calibrations (7.1)
        • 3.13.2. Process parameters (7.2)
      • 3.14. Vehicle maintenance window (8)
        • 3.14.1. Platform parameters (8.1)
        • 3.14.2. Pedal calibrations (8.2)
        • 3.14.3. Engine and drivetrain (8.3)
        • 3.14.4. Drive speed calibration (8.4)
        • 3.14.5. Inclinometer calibration (8.5) (Optional)
        • 3.14.6. Suspension (8.6) (Only in Drivedisplay2)
      • 3.15. Boom maintenance window (9)
        • 3.15.1. Boom control parameters (9.1)
        • 3.15.2. Joystick calibrations (9.2)
        • 3.15.3. Boom adjustments (9.3)
        • 3.15.4. Boom parameters (9.4)
        • 3.15.5. SmartSpray diagnostics (9.4) (Only in SmartSpray)
        • 3.15.6. Switch to 2 or 4 joystick controller (9.5)
      • 3.16. Diagnostics window (10)
        • 3.16.1. Module I/O diagnostics (10.1)
        • 3.16.2. Camera view (10.2)
        • 3.16.3. Support leg diagnostics (10.3)
        • 3.16.4. Measures (10.4)
        • 3.16.5. CAN diagnostics (10.5)
        • 3.16.6. Process diagnostics (10.6)
        • 3.16.7. Controller diagnostics (10.7)
        • 3.16.8. Wireless controller diagnostics (10.8)
      • 3.17. Compact Display Controller
    • 4. FUNCTIONS
      • 4.1. Starting up the system
      • 4.2. System update
      • 4.3. System backup
      • 4.4. System backup restoration
      • 4.5. Changing the access level using a code or a login key
        • 4.5.1. Changing the access level using a code
        • 4.5.2. Changing the access level using a login key
    • 5. Appendices
      • APPENDIX 1. System alerts
        • Table 1:
        • Table 1:
      • APPENDIX 2. I/O-errors
      • APPENDIX 3. System info texts
      • APPENDIX 4. SmartSpray alarms
      • APPENDIX 5. SmartSpray info texts
      • APPENDIX 6. NORDOSER/NORSTREAMER process start up enabling
      • APPENDIX 7. Warning symbol explanations
  • 0. Equipment
  • 1. Portable fire extinguisher
  • 2. Hydraulic high pressure pumps
  • 3. Automatic hose reel
  • 4. Lincoln
  • 5. Brigade
  • 6. Vibrator – VIBCO service manual
  • 7. Wiggins fuel system
  • 4. Schemas
    • e3_EN
    • Hyd
      • 100164968_0_1
        • 1
        • 2 =A01
        • 3 =H1.3
        • 4 =H01
        • 5 =H02
        • 6 =H03
        • 7 =H04
        • 8 =H09
        • 9 =H10.2
        • 10 =H10.3
        • 11 =H11
        • 12 =H12
        • 13 =H20
        • 14 =H24.1
        • 15 =H24.2
        • 16 =H25
        • 17 =H30
        • 18 =H40
        • 19 =S1
        • 20 =S01
        • 21 =S02
        • 22 =S3.4
        • 23 =S03.1
        • 24 =S05
        • 25 =W01
        • 26 =W05
        • 27 =W6.0
        • 28 =W6.1
        • 29 =W06
    • Ele
      • 100164788_0_1
        • 1
        • 2
        • 3
        • 4
        • 5 =CM +TB7
        • 6 =CM +TB7
        • 7 =MM +TB1
        • 8 =MM +TB1
        • 9 =MM +TB1
        • 10 =PM +TB5
        • 11 =PM +TB5
        • 12 =PM +TB5
        • 13 +TB50
        • 14 +TB20
        • 15 =MM +TB107
        • 16 +CDC
        • 17 +CDC
        • 18 =PM
        • 19 =MM
        • 20 =MM
        • 21 =MM
        • 22 =MM
        • 23 =MM
        • 24 =MM
        • 25
        • 26
        • 27
        • 28
        • 29 =MM
        • 30 =MM
        • 31 =MM
        • 32
        • 33
        • 34
        • 35 =MM
        • 36
        • 37
        • 38
        • 39
        • 40
        • 41
        • 42 =MM +TB1
        • 43 =MM +EMH
        • 44 =MM +EMH
        • 45 =MM
        • 46 =CM +CABIN
        • 47 =CM
        • 48 =PM +TB5
        • 49 =PM +TB5
        • 50 =PM
        • 51 =PM
        • 52 =PM +TB5
        • 53 =PM
        • 54 =PM
        • 55 =PM
        • 56 =PM +TB5
        • 57 =PM +TB5
        • 58 =PM +TB5
        • 59 =PM +TB5
        • 60 =PM +TB5
        • 61 =PM +TB5
        • 62 +TB50
        • 63 +TB50
        • 64 +TB50
        • 65 +TB50
        • 66 +TB50
        • 67 +TB50
        • 68 +TB50
        • 69 +CDC
        • 70 +CDC
        • 71 +CDC
        • 72 +CDC
        • 73 =CM
        • 74 +TB20
        • 75 =MM +TB107
        • 76 =PM
        • 77 =CM
  • Normet_CC_Mining_140912_ENG
  • Normet_CC_Tunnelling_140911_ENG
  • Normet_Sprayed_Concrete_Brochure_171227_ENG

Normet

Latest Product

0
    0
    Your Cart
    Your cart is emptyReturn to Shop