$ 0
0
$ 0
0

Takeuchi TL8, TL10, TL12 Track Loader Operators Manual (AU8E012)

Format: PDF (Printable Document)

File Language: English

File Pages: 265

File Size: 19.96 MB (Speed Download Link)

Brand: Takeuchi

Model: TL8, TL10, TL12 Track Loader

Book No: AU8E012

Type of Document: Operators Manual

Categories: ,

$ 40

Share:

Takeuchi TL8, TL10, TL12 Track Loader Operators Manual (AU8E012)

Takeuchi TL8, TL10, TL12 Track Loader Operators Manual (AU8E012)

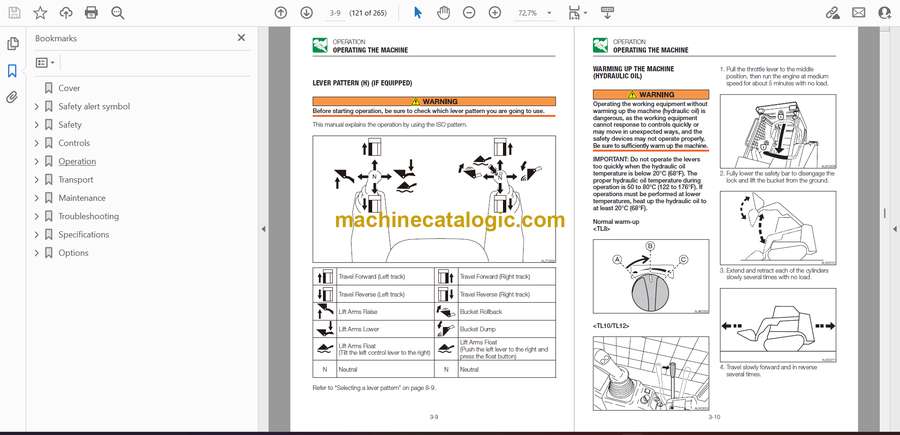
On these TL8, TL10 and TL12 track loaders, you’re usually working in tight, rough jobsites—muddy house pads, demolition rubble, or uneven fill—where visibility and load control matter. This operators manual helps you run the machine the way it was designed to be run: setting up the controls properly, understanding how it should feel under load, and catching small issues before they turn into downtime. For example, if the loader starts nosing down on a slope with a full bucket, this book helps you verify your operating technique, check basic settings, and adjust how you approach the grade.

Applications & Use Cases

  • Daily walk‑around checks so you can spot loose tracks, leaks, or cracked attachments before starting work.
  • Learning proper control use on slopes and uneven ground to keep the machine stable with a raised load.
  • Understanding machine response under heavy pushing or lifting, so you don’t overstress the drivetrain or hydraulics.
  • Setting good operating habits in tight spaces, improving visibility and awareness around trucks, walls, and personnel.
  • Reducing premature wear on tracks and pins by using correct turning, travel, and loading techniques.

FAQ

Q: Can I keep a copy of this manual on my phone or tablet for the jobsite?

A: Yes, you can use a digital copy so you can zoom diagrams and search terms while you’re standing next to the machine.

Q: Is it worth printing parts of this manual?

A: Many techs print the key operating and checklists pages, laminate them, and keep them in the cab for quick reference during start-up and shutdown.

Safety Note

Always follow the manual’s operating guidance and never exceed what feels stable for the loader on the ground you’re working.

📘 Show Index

Takeuchi TL8, TL10, TL12 Track Loader Index:

  • Cover
  • Safety alert symbol
    • Signal words
    • Introduction
      • Foreword
      • Manual storage compartment
      • Serial numbers
    • Machine description
      • Front, rear, left and right
      • Designated operations
      • Features
      • Break-in period
    • Notes on reading this manual
  • Safety
    • General precautions
    • Precautions when preparing
    • Precautions when starting
    • Precautions when operating
    • Precautions when stopping
    • Precautions when transporting
    • Precautions on maintenance
    • Safety signs (decals)
  • Controls
    • Names of components
    • Covers
      • Ignition key
      • Fuel filler port
      • Engine hood
      • Rear door
    • Cab
      • Cab door
      • Side Window
      • Emergency exit
      • Fuse box
    • Lift arm stopper
    • Seat and seat belt
      • Seat
      • Seat belt
      • 3-point seat belt (optional)
    • Instrument cluster
      • Warning lamps
      • Indicators
      • Meters
      • Multi-data display
    • Switches
      • Ignition switch
      • Engine shutdown switch
      • Horn button
      • Float button
      • Throttle controller
      • Multifunction buttons
      • Auxiliary hydraulic switches
      • Travel speed button
      • Front wiper switch (optional) Rear wiper switch (optional)
      • Front light switch
      • Tail light switch
      • ECO/Power mode select switch
      • DPF manual regeneration/inhibit select switch
      • Auxiliary 1st flow rate select switch
      • Parking brake switch (TL12 optional)
      • Ride control switch (TL10/TL12 optional)
      • Aux. 2nd/14-pin connector select switch (TL10/TL12 optional)
      • 14-pin connector G/H select switch (optional)
    • Levers and Pedal
      • Safety Bar
      • Throttle lever (TL10/TL12)
      • Throttle pedal (optional)
      • Right control lever
      • Left control lever
    • Accessories
      • Air conditioner
      • External power socket
      • Interior light
      • Mirrors
      • Radio (for cab optional)
      • Auxiliary hydraulic lines (optional)
      • Aux. 2nd lines (TL10/TL12 optional)
      • High-Flow Hydraulic System (If equipped)
      • Lift arm lower button (If equipped)
      • Blow by heater lamp (If equipped)
      • Active power control (If equipped)
  • Operation
    • Before starting operation
      • Getting on or off the machine
      • Walk-around inspection
      • Daily inspection
    • Starting and stopping the engine
      • Before starting the engine
      • Starting the Engine
      • Warming up the engine
      • Stopping the engine
    • Operating the machine
      • Lever pattern (ISO)
      • Lever pattern (H) (If equipped)
      • Warming up the machine (hydraulic oil)
      • Inspection after warm-up
      • Traveling the machine
      • Stopping travel
      • Operating the working equipment
    • Operating procedures
      • Prohibited operations
      • Cautions on operating
      • Cautions on traveling on slopes
      • Operations possible with this machine
    • Parking the machine
      • Parking
      • Inspection and checks after stopping the engine
    • Handling in cold climates
      • Preparing for cold climates
      • Cautions after operations
      • After the cold climate
    • Handling rubber tracks
      • Prohibitions
      • Cautions
      • Preventing the rubber tracks from coming off
    • Handling the engine
      • Prohibitions
      • Cautions
      • Diesel fuel
  • Transport
    • Loading and unloading
    • Hoisting the machine
    • Securing the machine
  • Maintenance
    • General
      • Maintenance overview
      • Cautions on maintenance
    • Service data
      • Fuel and lubricant table
      • Regularly replace the hydraulic oil
      • List of consumables
      • List of tools (If equipped)
      • List of tightening torques
    • Safety-critical parts
    • Maintenance list
    • Walk-around inspection
      • Inspecting by opening the engine hood and rear door
      • Inspecting by walking around the machine
      • Inspecting while sitting in the operator’s seat
    • Daily inspection (every 10 hours)
      • Inspecting and replenishing the coolant
      • Inspecting and replenishing the engine oil
      • Inspecting the water separator
      • Inspecting the fuel level
      • Inspecting the hydraulic oil tank level and replenishing
      • Lubricating the working equipment
      • Inspecting and removing combustible materials from the rear and belly of machine
    • After the initial 50 hours (only for new machines)
      • Replacing the engine oil and the oil filter
      • Replacing the hydraulic oil return filter
      • Replacing the pilot line filter
      • Inspecting and adjusting the fan belt
      • Inspecting and adjusting the compressor belt (AC)
    • Every 50 hours
      • Inspecting and adjusting the track tension
      • Draining the water from the fuel tank
      • Inspecting the battery fluid level and replenishing
      • Inspecting the bucket stoppers (bolts/nuts)
      • Inspecting for and removing any combustibles around the battery
    • Every 100 hours
      • Cleaning the water separator
    • After the initial 250 hours (only for new machines)
      • Replacing the travel motor gear oil
    • Every 250 hours
      • Inspecting and adjusting the fan belt
      • Inspecting and adjusting the compressor belt (AC)
      • Replacing the air cleaner element
      • Cleaning the radiator fins and the oil cooler fins
      • Cleaning the condenser (AC)
      • Cleaning the air filters (AC)
      • Inspecting the refrigerant (gas) level (AC)
    • Every 500 hours
      • Replacing the engine oil and the oil filter
      • Replacing the hydraulic oil return filter
      • Replacing the pilot line filter
      • Replacing the travel motor gear oil
      • Replacing the fuel filters
      • Adjusting or replacing the bucket stoppers (bolts/nuts)
    • Every 1000 hours
      • Cleaning the engine cooling system
      • Replacing the hydraulic oil and cleaning the suction strainer
      • Inspecting and adjusting the engine valve clearance
    • Every 1500 hours
      • Replacing the oil separator element
      • Inspecting the injector tip
      • Inspecting the EGR cooler
      • Inspecting the PCV valve (TL10/TL12)
    • Every 3000 hours
      • Inspecting the turbocharger
      • Inspecting the EGR system
    • Every 6000 hours
      • Cleaning the DPF
    • When required
      • Replacing the bucket or attachment
      • Inspecting and replenishing the windshield washer fluid
      • Lubricating the levers
      • Inspecting the rubber tracks
    • Every year
      • Replacing the receiver drier
    • Tilting up the canopy (cab)
    • Maintenance during extended storage period
  • Troubleshooting
    • Symptoms that are not malfunctions
    • If the engine overheats
    • If the battery goes dead
    • If a fuse blows
      • Inspecting and replacing the fuse
      • Inspecting the fusible link
    • Restarting after adding fuel
      • Bleeding air from the fuel system
    • If a warning lamp flashes
    • Vehicle error code list
    • Engine error code list
    • Other symptoms
    • Lowering the lift arms to the ground
    • Towing
    • If the cab or canopy is damaged
    • Exhaust gas control system error
      • Error code list
      • NOx control diagnostic system (NCD)
      • Particulate control diagnostic system (PCD)
      • Limiting the engine output
  • Specifications
    • Basic Specifications
    • Machine dimensions
    • Operating ranges
  • Options
    • General precautions
      • Safety precautions
      • Cautions when installing attachments
      • Cautions when operating attachments
    • Hydraulic quick-hitch
      • Replacing the Bucket or Attachment
    • Quick-Couplers
    • 4-Port quick-coupler (TL10/TL12)
    • Selecting a lever pattern
      • Switching the lever pattern
    • Seat (with a switch function)
    • Optional equipment mass
    • Takeuchi Fleet Management
    • Installing optional equipment on the rear of the machine

Weidemann

Latest Product

0
    0
    Your Cart
    Your cart is emptyReturn to Shop