John Deere 643J and 843J Feller Buncher Repair Technical Manual (TM2217)
John Deere 643J and 843J Feller Buncher Repair Technical Manual (TM2217) (2)
John Deere 643J and 843J Feller Buncher Index:
Contents
General Information
Safety Information
Recognize Safety Information
Understand Signal Words
Handle Fluids Safely—Avoid Fires
Prevent Battery Explosions
Prepare for Emergencies
Prevent Acid Burns
Handle Chemical Products Safely
Avoid High-Pressure Fluids
Park Machine Safely
Support Machine Properly
Wear Protective Clothing
Work in Clean Area
Service Machines Safely
Beware of Exhaust Fumes
Illuminate Work Area Safely
Replace Safety Signs
Use Proper Lifting Equipment
Remove Paint Before Welding or Heating
Avoid Heating Near Pressurized Fluid Lines
Service Tires Safely
Avoid Harmful Asbestos Dust
Practice Safe Maintenance
Use Proper Tools
Dispose of Waste Properly
Use Handholds and Steps
Travel Safely
Service Cooling System Safely
Handle Starting Fluid Safely
Prevent Machine Runaway
Handle Engine Side Panels Safely
General Specifications
643J (Shown with Continuous Saw)
643J Engine Specifications
643J Hydrostatic Transmission and Axles
643J Shear Specifications
643J Tire Specifications
Other Information—643J
643J Drain and Refill Capacities
843J (Shown with Continuous Saw)
843J Engine Specifications
843J Hydrostatic Transmission and Axles
843J Saw Specifications
843J Tire Specifications
Other Information—843J
843J Drain and Refill Capacities
Torque Values
Unified Inch Bolt and Cap Screw Torque Values
Metric Bolt and Cap Screw Torque Values
Check Oil Lines and Fittings
Service Recommendations for O-Ring Boss Fittings
Service Recommendations for Flat Face O-Ring Seal Fittings
Service Recommendations for 37° Flare and 30° Cone Seat Connectors
Service Recommendations For Flared Connections—Straight or Tapered Threads
Service Recommendations for Inch Series Four Bolt Flange Fittings
Service Recommendations for Metric Series Four Bolt Flange Fitting
Fuels and Lubricants
Diesel Fuel
Low Sulfur Diesel Fuel Conditioner
Diesel Fuel Storage
Fuel Tank
Do Not Use Galvanized Containers
Diesel Engine Oil
Hydraulic SystemThe hydraulic system tank supplies the oil for the steering system, the service brake system and the hydrostatic system., Differential, Pump Drive Gearbox, Two-Speed Gearbox and Cab Tilt Pump Reservoir Oil
Recommended Hydraulic System Summer Oils
Recommended Hydraulic System Winter Oils
Grease
Oil Filters
Alternative and Synthetic Lubricants
Lubricant Storage
Mixing of Lubricants
Wheels
Powered Wheels and Fastenings
Service Equipment and Tools
Specifications
Remove Wheel
Remove and Install Tire
Install Wheel
Axles and Suspension System
Removal and Installation
Service Equipment and Tools
Specifications
John Deere 1200 and 1400 Series Axles
Remove and Install Front Axle and Differential
Remove and Install Rear Axle and Differential
Input Drive Shafts and U-Joints
Specifications
Remove and Install Front Differential Drive Shaft
Remove and Install Rear Differential Drive Shaft
Hydraulic System
Differential Lock Circuit
Remove and Install Differential Lock Valve
Remove and Install Differential Lock Filter
Remove and Install Differential Lock Pump
Remove and Install Differential Lock Solenoid Valve
Transmission
Removal and Installation
Service Equipment and Tools
Other Material
Specifications
Remove and Install Transmission
Hydrostatic Transmission Start-Up Procedure
Control Linkage
Remove and Install Transmission Cylinder
Disassemble and Assemble Two-Speed Gearbox Cylinder
Gears, Shafts, Bearings, and Power Shift Clutch
Service Equipment and Tools
Other Material
Specifications
Disassemble and Assemble Two-Speed Gearbox
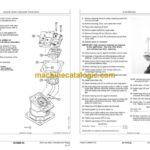
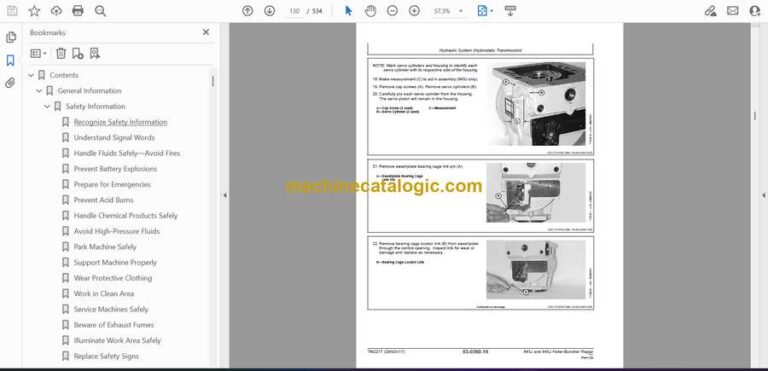
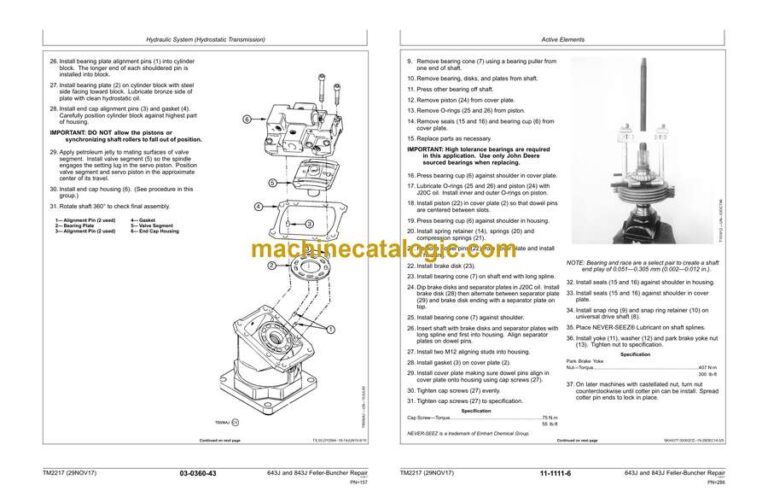
Hydraulic System (Hydrostatic Transmission)
Service Equipment and Tools
Other Material
Specifications
Remove and Install Hydrostatic Pump
Remove and Install Hydrostatic Pump Components
Remove and Install Charge Pump (843J)
Remove and Install Filtration Manifold
Remove and Install Multi-Function Valve
Remove and Install Displacement Control Valve
Remove and Install Charge Pressure Relief Valve
Disassemble Hydrostatic Pump
Assemble Hydrostatic Pump
Remove and Install Servo Bypass Valve
Disassemble and Assemble Servo Bypass Valve
Remove and Install Hydrostatic Motor
Remove and Install Motor Pressure Override (POR) Valve
Remove and Install Motor Charge Pressure Relief Valve
Remove and Install Multi-Function Valve Block
Disassemble and Assemble Multi-Function Valve Block
Remove and Install Motor End Cap
Disassemble and Assemble Motor End Cap
Disassemble and Assemble Hydrostatic Motor
Hydrostatic Motor Exploded View
Remove and Install FNR Control Valve
Disassemble and Assemble FNR Control Valve
Adjust FNR Control Pedal
Remove and Install Hydrostatic Oil Filter
Engine
Removal and Installation
Essential Tools
Service Equipment and Tools
Other Material
Specifications
PowerTechPowerTech is a trademark of Deere & Company.®6.8 L John Deere Engine—Use CTM104, CTM220
Alternators and Starting Motors—Use CTM77
John Deere Engine Accessories—Use CTM67
Remove and Install Engine
Bleed the Fuel System
Engine Auxiliary Systems
Cooling System
Other Material
Specifications
Cooling System Components
Remove Fan and Shroud
Install Fan and Shroud
Remove and Install Fan Belt
Remove Radiator and Oil Coolers
Install Radiator, Air and Oil Coolers
Intake System
Remove and Install Air Cleaner
Air Filter Inspection
Air Filter Replacement
Exhaust System
Remove and Install Exhaust
Fuel Supply System
Specifications
Fuel System Components
Remove and Install Fuel Inlet Strainer
Remove and Install Fuel Filters
Dampener Drive
Elements
Other Material
Specifications
Remove and Install Dampener Drive Plate
Splitter Drive (Pump Drive Gearbox)
Removal and Installation
Service Equipment and Tools
Specifications
Remove and Install Pump Drive Gearbox
Gears, Shafts and Bearings
Other Material
Specifications
Disassemble and Assemble Pump Drive Gearbox
Steering System
Hydraulic System
Service Equipment and Tools
Other Material
Specifications
Remove and Install Steering Wheel
Remove and Install Steering Column (843J)
Remove and Install Steering Column (643J)
Disassemble and Assemble Steering Column
Remove Steering Valve—Wheel Steer Machines
Install Steering Valve—Wheel Steer Machines
Disassemble Steering Valve—Wheel Steer Machines
Assemble Steering Valve—Wheel Steer Machines
Remove and Install Steering Cylinders
Disassemble and Assemble Steering Cylinders
Remove and Install Lever Steer Control Valve
Disassemble and Assemble Lever Steer Control Valve
Remove and Install Lever Steer Controller
Disassemble and Assemble Lever Steer Controller
Service Brakes
Active Elements
John Deere 1200, 1400 and 1600 Series Inboard Planetary Axles
Service Brake Repair
Hydraulic System
Specifications
Remove and Install Brake Valve
Bleed Brakes
Remove and Install Brake Accumulator
Park Brake
Active Elements
Specifications
Park Brake Remove and Install
Park Brake Disassemble and Assemble
Electrical System
Batteries, Support and Cables
Specifications
Handling Batteries Safely
Procedure for Testing Batteries
Using Booster Batteries—12 Volt System
Charge Batteries
Remove and Install Batteries
Alternator, Regulator and Charging System Wiring
Specifications
John Deere Alternators and Starting Motors—Use CTM77
Remove and Install Alternator
Check Belt Tensioner Spring Tension and Belt Wear
Wiring Harness and Switches
Special or Essential Tools
Replace DEUTSCHDEUTSCH is a trademark of the Deutsch Co.™ Connectors
Install DEUTSCHDEUTSCH is a trademark of the Deutsch Co.™ Contact
Replace WEATHER PACKWEATHER PACK is a trademark of Packard Electric.™ Connector
Install WEATHER PACKWEATHER PACK is a trademark of Packard Electric.™ Contact
Remove Connector Body from Blade Terminals
Remove Blade Terminals from Fuse Block
Replace Sealed Connectors
Cab Wire Harness
Main Instrument Panel Switches and Warning Lights
Ground Speed Limiter Wiring Harness
Battery Cables
Frame Wire Harness
Engine Wire Harness
Replacing Relays and Fuses
Remove and Install Park Brake Pressure Switch
Remove and Install Accumulator Open/Close Switch
Instruments and Indicators
Remove and Install Main Instrument Panel
Motors and Actuators
Specifications
John Deere Alternators and Starting Motors—Use CTM77
Remove and Install Starting Motor
Frame or Supporting Structure
Frame Installation
Essential Tools
Service Equipment and Tools
Specifications
Separate Frames
Inspect Pins and Bushings
Front Frame Seal and Taper Roller Bearing Installation
Rear Frame Bushing Installation
Attaching Frames
Remove and Install Hood Support
Remove and Install Grille
Remove Front Access Panel
Remove and Install Baffle
Frame Bottom Guards
Specifications
Remove and Install Front Frame Bottom Guard
Remove and Install Center Bottom Guard
Remove and Install Rear Bottom Guard
Operator’s Station
Removal and Installation
Service Equipment and Tools
Specifications
Remove and Install Cab
Operator’s Enclosure
Remove and Install Cab Doors
Remove and Install Cab Door Latch (Left Side)
Remove and Install Cab Door Latch (Right Side)
Remove and Install Cab Noise Control
Remove and Install Defrost Fan
Remove and Install Dome Light
Remove and Install Cab Windowpanes
Remove and Install Cab Door Windowpanes
Check and Clean Windows Regularly
Seat and Seat Belt
Specifications
Remove and Install Seat
Disassemble and Assemble Seat Assembly
Heating and Air Conditioning
Special or Essential Tools
Service Equipment and Tools
Other Material
Specifications
Air Conditioning System Fittings Reference Chart
R134a Refrigerant Cautions
Proper Refrigerant Handling
R134a Compressor Oil Removal
Refrigerant Hoses and Tubing Inspection
Leak Testing
R134a Component Oil Charge
R134a Refrigerant Recovery, Recycling and Charging Station Installation Procedure
Recover R134a System
Evacuate R134a System
Charge R134a System
Air Conditioner System Cleaning Procedures
Purge Air Conditioner System
Flush Air Conditioner System
Check Fan Belt Tension
Remove and Install Compressor
Disassemble and Assemble Compressor Clutch—R134a
Check Clutch Hub Clearance—R134a
Inspect Compressor Manifold—R134a
Disassemble, Inspect and Assemble Compressor—R134a
Remove and Install Compressor Relief Valve—R134a
Add Refrigerant Oil to System—R134a
Remove and Install High/Low Pressure Switch
Remove and Install Air Conditioning Condenser
Remove and Install Air Conditioning Motor Relay
Remove and Install Air Conditioning Switch
Remove and Install Receiver/Dryer
Remove and Install Pressurizer Housing
Remove and Install Expansion Valve
Expansion Valve Bench Test and Adjustment
Remove and Install Evaporator
Remove and Install Blower Fan
Remove and Install Blower Resistor
Remove and Install Blower Motor Control Switch
Remove and Install Heater Core
Remove and Install Heater Temperature Control
Remove and Install Freeze Control Switch
Test Freeze Control Switch
Remove and Install Defroster
Remove and Install Defroster Blower
Safety, Convenience and Miscellaneous
Fire Extinguisher
Specifications
Disassemble and Assemble Pressurized Water System
Fill and Charge Pressurized Water System
Remove and Install Fire Extinguisher
Horn and Warning Devices
Remove and Install Reverse Warning Alarm
Remove and Install Warning Horn
Main Hydraulic System
Hydraulic System
Essential Tools
Specifications
Remove and Install Continuous Saw Pump
Disassemble and Assemble Continuous Saw Pump
Continuous Saw Pump Start-up Procedure
Remove and Install Main Hydraulic Pump—Continuous Saw Machine
Disassemble and Assemble Main Hydraulic Pump—Continuous Saw Machine
Remove and Install Brake and Pilot Pump
Disassemble and Assemble Brake and Pilot Pump
Remove and Install Filler Hand Pump
Filler Hand Pump Test
Remove and Install Cooling Reverse Fan Pump
Remove and Install Main Hydraulic Filter
Remove and Install Cooling Reverse Fan Motor
Remove and Install Pilot Pressure Source Manifold
Disassemble and Assemble Pilot Pressure Source Manifold
Remove and Install Pressure Switch
Remove and Install Main Control Valve—Continuous Saw Machine
Disassemble and Assemble Main Control Valve—Continuous Saw Machine
Disassemble and Assemble Main Control Valve Section Assembly—Continuous Saw Machine
Remove and Install Pressure Relief Valve
Remove and Install Accumulator Open/Close Solenoid Valve
Remove and Install Park Brake Solenoid Valve
Remove and Install Lever Steer Solenoid Valve—Lever Steer Machine Only
Remove and Install Two-Speed Transmission Hi/Lo Solenoid Valve
Drive Shaft Seal Replacement
Remove and Install Ground Speed Limiter Valve
Remove and Install Cooling Reverse Fan Control Valve
