10% OFF on all manuals and programs. Use code: MCAT10
$ 0
0
$ 0
0

Manitou MLT-X 737 130 PS D ST3A S1 Manuel de Réparation (647681FR) (04-2020)

Format : PDF (Document imprimable)

Langue du fichier : Français

Nombre de pages : 484

Taille du fichier : 135.60 MB (Lien de téléchargement rapide)

Marque : Manitou

Modèle : MLT-X 737 130 PS D ST3A S1

N° de livre : 647681FR

Date de publication : 04-2020

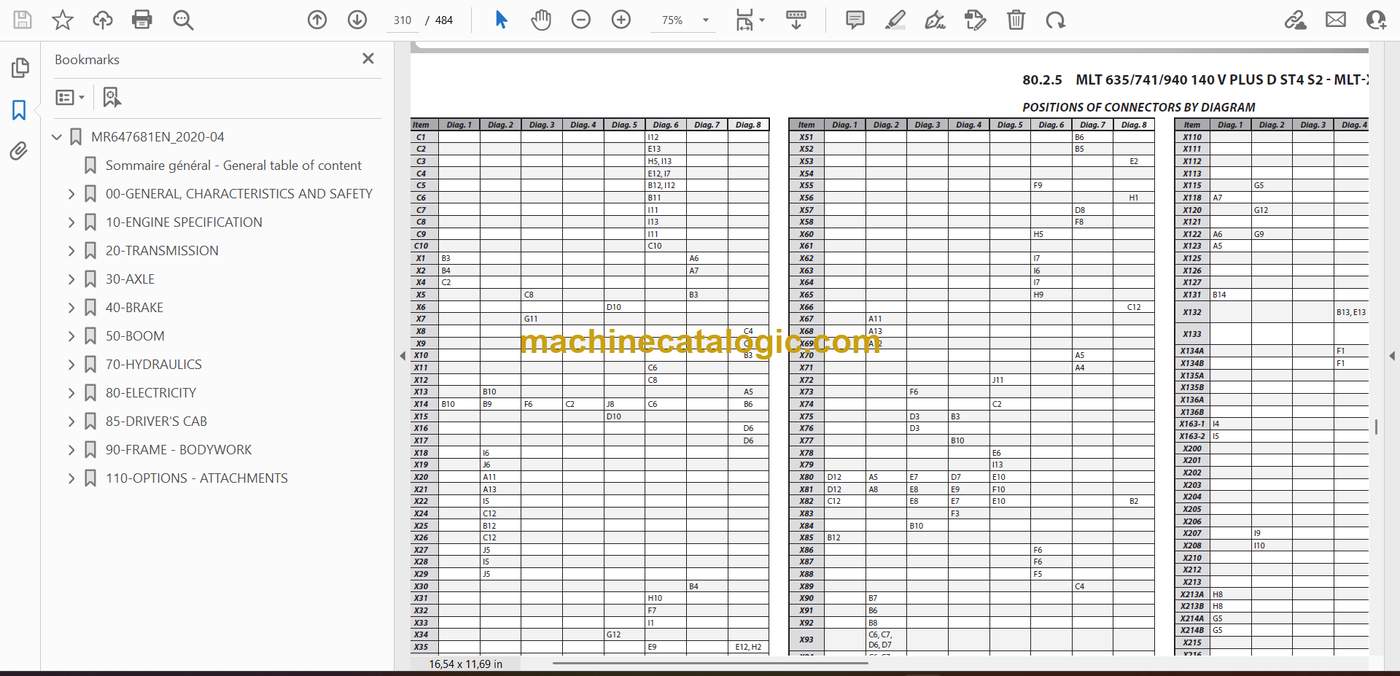
Type de document : Manuel de Réparation

Excellent Rating (4.8) on Trustpilot · Trusted Worldwide
Categories: ,

$ 40

Share:

Manitou MLT-X 737 130 PS D ST3A S1 Manuel de Réparation (647681FR) (04-2020)

Manitou MLT-X 737 130 PS D ST3A S1 Manuel de Réparation (647681FR) (04-2020)

Manitou MLT-X 737 130 PS D ST3A S1 Index:

  • MR647681EN_2020-04
    • Sommaire général – General table of content
    • 00-GENERAL, CHARACTERISTICS AND SAFETY
      • 00.1 GENERAL INSTRUCTIONS AND SAFETY NOTICE
        • 00.1.1 FOREWORD
        • 00.1.2 SERVICING POSITION
        • 00.1.3 EXPLANATION OF SYMBOLS
        • 00.1.4 SERVICING RULES
      • 00.2 GENERAL CHARACTERISTICS AND SPECIFICATIONS
        • 00.2.1 CHARACTERISTICS
        • 00.2.2 LUBRICANTS AND FUEL
        • 00.2.3 DIMENSIONS
          • MLT 635 / MLT 737
          • MLT 733 / MLT 733 TRACT / MLT 733 TRACT LSU
          • MLT 635 / MLT 741 – 140 V PLUS
          • MLT 940 – 140 V PLUS
      • 00.3 GENERAL LOCATION
        • 00.3.1 NAME AND IDENTIFICATION PLATE
      • 00.4 GENERAL CONTROL AND ADJUSTMENT
        • 00.4.1 STANDARD TIGHTENING TORQUES
        • 00.4.2 METRIC – IMPERIAL UNIT CONVERSION
    • 10-ENGINE SPECIFICATION
      • 10.1 Engine characteristics and specifications
        • 10.1.1 Characteristics
        • 10.1.2 Diesel exhaust fluid (DEF).
        • 10.1.3 Injection cycle
        • 10.1.4 Bosch CP4.1 high pressure pump
      • 10.2 Engine Schematic Diagrams
        • 10.2.1 Air intake circuit and EGR (Exhaust Gas Recirculation)
        • 10.2.2 Lubrication circuit
        • 10.2.3 Cooling circuit
        • 10.2.4 Fuel circuit
        • 10.2.5 DEF (Diesel Exhaust Fluid) circuit
      • 10.3 Engine components location
        • 10.3.1 Engine components
        • 10.3.2 Water and air cooling circuit
        • 10.3.3 Ventilation hydraulic circuit
        • 10.3.4 Diesel circuit
        • 10.3.5 Fuel injection circuit
        • 10.3.6 EGR (Exhaust Gas Recirculation) circuit
        • 10.3.7 DEF (Diesel Exhaust Fluid) circuit
      • 10.4 Engine controls and adjustments
        • 10.4.1 Engine start-up authorization conditions
        • 10.4.2 DEF regeneration
        • 10.4.3 DEF pump cleaning procedure
        • 10.4.4 Engine load level
        • 10.4.5 Ventilation regulation (MLT 733 as option)
          • A – function
          • B – principle of operation
          • C – schematic diagram
          • D – description of hydraulic engine with control
          • E – conditions of fan control-related components
        • 10.4.6 Silent block tightening torques
        • 10.4.7 Engine tightening torques
        • 10.4.8 Diesel fuel circuit tightening torques
        • 10.4.9 Exhaust circuit tightening torques
          • Assembly on MLT-X
          • Assembly on MLT
        • 10.4.10 Cooling circuit tightening torques
        • 10.4.11 Heating circuit tightening torques
      • 10.5 Engine removal – refitting
        • 10.5.1 Engine ECU removal – refit
        • 10.5.2 Air filter assembly removal
        • 10.5.3 Starter motor removal
        • 10.5.4 DOC exhaust pipe removal
        • 10.5.5 Remove the “SCR” pipe
        • 10.5.6 DEF injector removal
        • 10.5.7 DEF tank removal
          • DEF gauge removal
        • 10.5.8 Cooler removal
          • Removing the upper part.
          • Separation of cooler from engine.
          • Option 1: removal of pump and grill.
          • Option 2: removal of cooler assembly.
        • 10.5.9 Remove the engine
          • Engine hose and connector removal
          • Engine/Angle gear box transmission universal joint removal
        • 10.5.10 ATTACHMENT BELT REMOVAL
        • 10.5.11 Engine refit
        • 10.5.12 Alternator removal
        • 10.5.13 Water pump removal
        • 10.5.14 Turbo-compressor removal.
      • 10.6 Engine troubleshooting
      • 10.7 Specific engine tooling
        • 10.7.1 Special engine tooling
        • 10.7.2 Electronic tension meter
        • 10.7.3 DEF flush kit
    • 20-TRANSMISSION
      • 20.1 Transmission schematic diagrams
        • 20.1.1 Compact+ (C+) manual gearbox
          • C+ DRIVE TRAIN
          • C+ OPERATION OVERVIEWS
          • Summary table of connectors concerned by functions (C+)
        • 20.1.2 POWERSHIFT (PS – PG 115) gearbox
          • PS DRIVE TRAIN
          • PS OPERATION OVERVIEWS
          • Summary table of connectors concerned by functions (PS)
        • 20.1.3 Hydrostatic gearbox (zf 2 HC 85)
          • DRIVE TRAIN
          • OPERATION OVERVIEWS (ZF 2 hc 85)
          • pressure connectors
      • 20.2 Transmission locations
        • 20.2.1 MECHANICAL TRANSMISSION AND GEARBOX COOLING
        • 20.2.2 POWERSHIFT (PG 115) GEARBOX COMPONENTS
        • 20.2.3 Hydrostatic TRANSMISSION (zf 2 HC 85)
      • 20.3 Transmission controls and adjustments
        • 20.3.1 Hydrostatic auto-calibration
        • 20.3.2 Verification of machine configurations
        • 20.3.3 General authorisation conditions for carriage movement
          • Acquisition conditions
          • Upkeep conditions
          • Loss conditions
        • 20.3.4 Powershift – PG115 gearbox
          • ECU Transmission (X322)
          • Automatic gear change mode
          • Table of maximum speeds per gear
          • SHAFT AND CLUTCH
          • GEAR SET
          • DRIVE TRAIN
          • TABLE OF PRESSURES
          • PRESSURE TEST PORT LOCATIONS
        • 20.3.5 Hydrostatic gearbox (zf 2 HC 85)
          • Operating mode – 2 HC 85
          • Key for HYDROSTATIC CIRCUITS 2 HC-85
          • Diagram: Neutral
          • Diagram: drive range 1
          • Diagram: drive range 2
          • Diagram: drive range 3
        • 20.3.6 TRANSMISSION TIGHTENING TORQUES
          • MLT 635 – 737 PS
          • MLT 733
          • MLT 635 – 741 – 940 V PLUS
        • 20.3.7 Changing to freewheel mode (Mechanical transmission)
        • 20.3.8 Changing to freewheel mode (Hydrostatic transmission)
          • After towing
      • 20.4 Transmission removal – refit
        • 20.4.1 Remove the Powershift gear box
        • 20.4.2 Removal of the manual gearbox assembly – angle transmission
        • 20.4.3 Remove the hydrostatic gearbox (zf 2 HC 85)
        • 20.4.4 Remove the hydrostatic pump
          • Remove the hydraulic pump
          • Remove the hydrostatic pump
      • 20.5 Specific transmission tooling
        • 20.5.1 BASIC MANOMETER BOX
        • 20.5.2 DIGITAL MANOMETER BOX
        • 20.5.3 Hydrostatic gearbox removal tool
    • 30-AXLE
      • 30.1 Axle controls and adjustments
        • 30.1.1 Tightening torques
    • 40-BRAKE
      • 40.1 Brake characteristics and specifications
        • 40.1.1 Service brake
          • Assembly with master cylinder.
          • Assembly with hydraulic valve.
        • 40.1.3 Trailer brake valve
        • 40.1.4 Accumulator load valve
        • 40.1.5 Service brake valve 55 b
      • 40.2 Service brake schematic diagrams
        • 40.2.1 Brake valve (VAFS) operating principle
          • Engine on, pump running, pedal at rest
          • Engine on, pump running, pedal activated
          • Engine off, pump shut down, pedal activated
      • 40.3 Brake locations
        • 40.3.1 Brake locations – Mechanical transmission
          • MLt 635/737 – MLT 733 S2/S3 Tract+LSU (Up to machine no. MAN00000K01007220 )
          • MLt 635/737 – MLT 733 S3 Tract+LSU (up to machine no. MAN00000K01007221)
          • Brake system location – MLT 733 S2/S3
        • 40.3.2 Brake locations – Hydrostatic transmission
      • 40.4 Brake controls and adjustment
        • 40.4.1 TRAILER BRAKE VALVE TIGHTENING TORQUE
        • 40.4.2 Adjustment of parking brake on gearbox
          • for machines before tractor standard 167-2013
        • 40.4.3 Adjustment of parking brake on front axle
          • For tractor standard 167-2013 machines
        • 40.4.4 Adjusting the brake pedal
          • MLT 733 105 D
          • MLT 635/737 130 PS – MLT 733 105 D Tract (up to machine no.)
          • MLT 635/737 130 PS – MLT 733 115 D Tract (from machine no.)
          • MLT 635/741/940 140 v plus
        • 40.4.5 Calibrate the inching pedal
        • 40.4.6 Bleed the brakes
        • 40.4.7 Taking brake pressure on MLT 140 V PLUS
        • 40.4.8 Towing the lift truck
          • Mechanical transmission
          • Hydrostatic transmission
      • 40.5 Brake removal – refit
        • 40.5.1 Brake master cylinder on mlt ps
      • 40.6 Specific brake tooling
        • 40.6.1 BRAKE FLUID BLEEDER
    • 50-BOOM
      • 50.1 BOOM CHARACTERISTICS AND SPECIFICATIONS
        • 50.1.1 DUPLEX BOOMS
        • 50.1.2 TRIPLEX BOOMS
      • 50.2 BOOM location
        • 50.2.1 DUPLEX BOOM (6 and 7 m)
        • 50.2.2 TRIPLEX BOOM (9 m)
      • 50.3 BOOM CONTROL AND ADJUSTMENT
        • 50.3.1 TELESCOPE EXTENSION AND RETRACTION ADJUSTMENT PROCEDURE
          • TELESCOPE EXTENSION SPEED ADJUSTMENT (TRIPLEX BOOM).
          • TELESCOPE RETRACTION SPEED ADJUSTMENT (DUPLEX AND TRIPLEX BOOM).
          • INNER TELESCOPE RETRACTION DE-SYNCHRONISATION (TRIPLEX BOOM).
        • 50.3.2 RECOMMENDATION FOR FITTING SHIMS AND LUBRICATION
        • 50.3.3 Duplex TIGHTENING TORQUE AND LUBRICATION
        • 50.3.4 Triplex TIGHTENING TORQUE AND LUBRICATION
      • 50.4 Removal – refit
        • 50.4.1 duplex boom
          • Telescope removal
          • Telescope removal
          • Telescopic Cylinder Removal
          • Refit:
        • 50.4.2 triplex boom
          • PREPARATION AND SAFETY INSTRUCTIONS
          • Telescoping circuit removal
          • BOOM HEAD TELESCOPE T2 REMOVAL
          • INTERMEDIATE TELESCOPE T1 REMOVAL
      • 50.5 Special boom tools
        • 50.5.1 FLARE NUT WRENCHES
        • 50.5.2 MAGNETIC LIFTER
    • 70-HYDRAULICS
      • 70.1 Hydraulic characteristics and specifications
        • 70.1.1 Dynamic steering operation
        • 70.1.2 Hydraulic component sheets
          • Accumulator block
          • OSPC 200 LS steering block
          • Pilot safety valve
          • Pilot safety valve
          • Distributor RS 14
          • Distributor SDS 140
          • FAN REGULATOR MOTOR (FAN DRIVE)
          • Casappa MVP 60 – 63 pump
          • HYDROSTATIC pump LA10V072EK1DS/53R
      • 70.2 Hydraulic schematic diagrams
        • 70.2.1 Key S2
        • 70.2.2 Key S3
        • 70.2.3 Diagram MLT 635-737 130 PS D ST4 S2 (1st fit)
        • 70.2.4 Diagram MLT 635-737 130 PS D ST4 S2 (2nd fit) + mlt-x 737 130 ps d st3a s1
        • 70.2.5 Diagram MLT 733 105 D ST4 S2
        • 70.2.6 Diagram MLT 733 105 D ST4 S2 TRACT
        • 70.2.7 Diagram MLT 733 105 d ST4 S2 TRACT LSU
        • 70.2.8 Diagram MLT 635/741/940 140 V Plus D ST4 S2 + MLT-X 741 140 V Plus D ST3A S1
        • 70.2.9 Diagram MLT 733 115 D ST4 S3
        • 70.2.10 Diagram MLT 733 115 D ST4 S3 TRACT
        • 70.2.11 Diagram MLT 733 115 D ST4 S3 TRACT LSU
      • 70.3 Hydraulic locations
        • 70.3.1 Key
      • 70.4 Hydraulic controls and adjustments
        • 70.4.1 Flush the MLT 733 distributor (initial fitting)
      • 70.5 Hydraulics removal – refit
        • 70.5.1 Remove the hydraulic pump
        • 70.5.2 Lifting cylinder removal
        • 70.5.3 Remove the distributor
      • 70.6 Hydraulic specific tooling
        • 70.6.1 Square bracket
        • 70.6.2 Distributor lifting device
        • 70.6.3 DIGITAL MANOMETER BOX
        • 70.6.4 BASIC MANOMETER BOX
        • 70.6.5 INFLATION KIT BOX
    • 80-ELECTRICITY
      • 80.1 Electricity characteristics and specifications
        • 80.1.1 Location of relays and fuses
        • 80.1.2 Screen menus
        • 80.1.3 Electrical network architecture
        • 80.1.4 Electrical network architecture details
        • 80.1.5 ECU Inputs/Outputs
          • X13/X25 – screen (A9)
          • X14 – Navigator (A4)
          • X39-C10 – Air-conditioning ECU (A17)
          • X80 – Main ECU SPU 40-26 (A2)
          • X81 – Main ECU SPU 40-26 (A2)
          • X82 – Main ECU SPU 40-26 (A2)
          • X274 – Engine ECU EDC17CV52 (A19)
          • X275 – Engine ECU EDC17CV52 (A19)
          • X322 – Powershift gearbox ECU PG115 (A10)
          • X356 – Auxiliary ECU SPU 25-15 (A3)
          • X357 – Auxiliary ECU SPU 25-15 (A3)
          • X400 – Gearbox ECU ZF – 2HC85 _ Box CVT (A10)
          • X401 – Gearbox ECU ZF – 2HC85 _ Box CVT (A10)
        • 80.1.6 Technical sheets for electrical components
          • X1/X2 – starter ignition switch (A12)
          • X10 – lighting commutator switch (S5)
          • X11 / 12 – windscreen wiper commutator switch (S4)
          • X34 – Outside air temperature sensor
          • X56 – Rotating beacon light (e15)
          • X72 – Brake fluid level switch (S11)
          • X74 – Accelerator potentiometer (B18)
          • X75/X76 – JSM (A12)
          • X77 – BMEP (A11)
          • X78 – Manual accelerator
          • X79 – stop pressure switch (B8)
          • X90 to X94 – DSB (Double Switch Board) (S61 to S76)
          • X121 – Brake pedal angular sensor (PS) (B47)
          • X225 – DEF tank gauge (B53)
          • X225 – DEF tank analog gauge (US) (B53)
          • X245 – Supercharged air cooler temperature sensor
          • X246 – Transmission oil cooler temperature sensor
          • X247 – Hydraulic fluid cooler temperature sensor
          • X252 – VENTILATION CONTROL ELECTROVALVE
          • X253 – VENTILATION inversion ELECTROVALVE
          • X265 – Fuel level sensor (R2)
          • X300 – Angle boom potentiometer (B23)
          • X334 – Telescope retracted position sensor (S34)
          • X382 – Brake circuit pressure switch (B30)
      • 80.2 Wiring diagrams
        • 80.2.1 Examples of coding on the wiring diagrams
        • 80.2.2 Cable marking on an electrical wiring harness
        • 80.2.3 MLT 635/737 130 PS D ST4 S2 – MLT-X 737 130 ps d st3a s1
          • Positions of connectors by diagram
          • Diagram 1 – Starting
          • Diagram 2 – Networks (CAN & lin)
          • Diagram 3 – Transmission
          • Diagram 4 – Hydraulics
          • Diagram 5 – Sensor
          • Diagram 6 – Ventilation, wipers and air conditioning
          • Automatic air conditioning option
          • Diagram 7 – Options
          • Diagram 8 – Lights and signals
        • 80.2.4 MLT 733 105 D ST4 S2+ S3 + TRACT + LSU
          • Positions of connectors by diagram
          • Diagram 1 – Starting
          • Diagram 2 – Networks (CAN & lin)
          • Diagram 3 – Transmission
          • Diagram 4 – Hydraulics
          • Diagram 5 – Sensor
          • Diagram 6 – Ventilation, wipers and air conditioning
          • Automatic air conditioning option
          • Diagram 7 – Options
          • Diagram 8 – Lights and signals
        • 80.2.5 MLT 635/741/940 140 V plus d ST4 S2 – MLT-X 741 140 V plus d ST3a S1
          • Positions of connectors by diagram
          • Diagram 1 – Starting
          • Diagram 2 – CAN & lin networks
          • Diagram 3 – Transmission
          • Diagram 4 – Hydraulics
          • Diagram 5 – Sensor
          • Diagram 6 – Ventilation, wipers and air conditioning
          • Automatic air conditioning option
          • Diagram 7 – Options
          • Diagram 8 – Lights and signals
      • 80.3 Electricity locations
        • 80.3.1 MLT mechanical transmission
          • Key
          • Frame 3D PS Harness
          • Frame 3D Mechanical Harness
          • Cab 3D mechanical & PS harness
          • Engine 3D MLT mechanical & PS harness
          • Deutz engine 3D harness
          • Frame 2D PS Harness
          • Frame 2D Mechanical Harness
          • Cab 2D harness
          • Engine 2D harness
          • Valve bank 2D harness
        • 80.3.2 MLT V plus
          • Key
          • Frame 3D V plus harness
          • Cab 3D v plus harness
          • Engine 3D MLT V plus harness
          • Deutz engine 3D harness
          • Frame 2D V plus harness
          • Cab 2D V PLUS harness
          • Engine 2D harness
          • Valve bank 2D harness
      • 80.4 Electrical removal – refit
        • 80.4.1 Remove the battery.
        • 80.4.2 Remove the engine ECU
          • Refit
        • 80.4.3 Remove the main ECU “SPU 40-26”
        • 80.4.4 Remove the transmission ECU
          • powershift “pg115”
          • Hydrostatic “ZF EC2 B”
        • 80.4.5 Remove the auxiliary ECU “SPU 25-15”
        • 80.4.6 Remove the dashboard screen
        • 80.4.7 Remove – Replace JSM on BMEP
        • 80.4.8 Replace the strain gauge
          • Location
          • Axle preparation
          • Characteristics of products used
          • Characteristics of fastening screws
          • Assembly precautions and tightening torque
      • 80.5 Electrical troubleshooting
        • 80.5.1 Error codes (DTC)
          • DTC ECU HARMONY screen (X13)
          • Air Conditioning ECU DTC (X39-C10)
          • Main ECU DTC SPU 40-26 (X80 – X81 – X82)
          • Engine ECU DTC EDC17CV52 (X274 – X275)
          • Transmission ECU DTC PS+ PowershifT PG115 (X322)
          • Auxiliary ECU DTC SPU 25-15 (X356 – X357)
          • Transmission ECU DTC CVT 2 HC85 (X400 – X401)
      • 80.6 Specific electric tooling
        • 80.6.1 Breakout boxes
        • 80.6.2 Electrovalve adapter
        • 80.6.3 Diagnostic tools
          • DIAGNOSTICS CASE
          • CONNECTIONS TO THE LIFT TRUCK
          • ENGINE ADAPTATION KIT
    • 85-DRIVER’S CAB
      • 85.1 Driver’s cab control and adjustment
        • 85.1.1 Tightening torques
          • Cab silent block
          • Air conditioning
        • 85.1.2 Door opening/closing control adjustment
      • 85.2 Removal – refitting driver’s cab
        • 85.2.1 Cab removal
        • 85.2.2 Windscreen removal
          • Procedure for opening the protective grille.
        • 85.2.3 Door winder removal
          • Door trim panel removal
          • Removal of door interior
          • Refit
        • 85.2.4 Cab door removal
        • 85.2.5 Windscreen wiper motor removal
        • 85.2.6 Cab lower trim removal
        • 85.2.7 Upper dashboard removal
        • 85.2.8 Heating block removal
        • 85.2.9 Driver’s seat removal
        • 85.2.10 Armrest removal
        • 85.2.11 Dashboard switch removal
      • 85.3 Specific cab tooling
        • 85.3.1 Cab grille hinge kit
    • 90-FRAME – BODYWORK
      • 90.1 Removal – refitting frame – bodywork
        • 90.1.1 Removing the engine cover
    • 110-OPTIONS – ATTACHMENTS
      • 110 Intelligent hydraulics OPTION
        • 110.1 Characteristics and specifications
        • 110.2 Location of components
          • 110.2.1 Assembly on 6 or 7 metre boom
          • 110.2.2 Assembly on 9 metre boom
      • 110 Automatic parking brake OPTION
        • 110.1 Characteristics and specifications
          • 110.1.1 functional electrical architecture
          • 110.1.2 Technical sheets for electrical components
          • 110.1.3 operating modes: 2 possibilities (manual and automatic).
        • 110.2 Schematic diagram
        • 110.3 Location
        • 110.4 Automatic parking brake control and adjustment
      • 110 Pneumatic trailer braking OPTION
        • 110.5 Characteristics and specifications
          • 110.5.1 Operation
          • 110.5.2 Component sheets
        • 110.6 Schematic diagram
          • 110.6.1 Machine off
          • 110.6.2 Machine on and parking brake applied
          • 110.6.3 Machine on unbraked
          • 110.6.4 Machine on and brake pedal pressed
          • 110.6.5 Machine on and parking brake test
        • 110.7 Location
      • 110 Optional automatic central greasing
        • 110.8 Characteristics and specifications
          • 110.8.1 The auto greasing system
          • 110.8.2 The pump
          • 110.8.3 Distributors
          • 110.8.4 Monitoring/storage of data
        • 110.9 Distributor schematic diagrams
        • 110.10 Location
        • 110.11 Control and adjustment
          • 110.11.1 The cab warning light
          • 110.11.2 The test button
          • 110.11.3 System filling and bleeding
          • 110.11.4 Maintenance
          • 110.11.5 Checks
        • 110.12 Troubleshooting
          • 110.12.1 Detect faults
          • 110.12.2 Faults table
          • 110.12.3 Error codes table
      • 110 Camera option
        • 110.1 Characteristics and specifications
          • 110.1.1 Front, rear and boom head camera system
          • 110.1.2 Operation
        • 110.2 Location
        • 110.3 Control and adjustment
          • 110.3.1 Dashboard adjustments.
          • 110.3.2 Boom head camera support.
      • 110 Engine eco-stop OPTION
        • 110.5 Characteristics and specifications
          • 110.5.1 operating modes
        • 110.6 Engine eco-stop schematic diagram
        • 110.7 Engine eco-stop location
        • 110.8 Eco-stop control and adjustment
      • 110 AIR CONDITIONING OPTION
        • 110.9 Air conditioning characteristics and specifications
          • 110.9.1 Description of operation
          • 110.9.2 Operating principle
          • 110.9.3 Automatic air conditioning ECU Inputs/Outputs
          • 110.9.4 Evaporator temperature sensor specifications
        • 110.10 Air conditioning location
          • 110.10.1 Location and tightening torques
          • 110.10.2 HVAC interior components
          • 110.10.3 HVAC exterior components
          • 110.10.4 Automatic air conditioning locations
          • 110.10.5 Condenser components
        • 110.11 Air conditioning controls and adjustments
          • 110.11.1 General check points
          • 110.11.2 ASSEMBLY INSTRUCTIONS FOR AIR CONDITIONING CIRCUIT
          • 110.11.3 Safety measures for handling the r134a
          • 110.11.4 Refrigerant fluid load for the air conditioning circuit
          • 110.11.5 Check the evaporator temperature sensor
        • 110.12 Air conditioning removal – refit
          • 110.12.1 Air conditioning belt removal
          • 110.12.2 Air conditioning belt refit
        • 110.13 Air conditioning troubleshooting
          • 110.13.1 Temperature troubleshooting
          • 110.13.2 ABNORMAL NOISE ON A/C SYSTEM
          • 110.13.3 UNPLEASANT SMELL
          • 110.13.4 X39 (C10) – Automatic air-conditioning error codes (DTC)
        • 110.14 Specific air conditioning tooling
          • 110.14.1 Fitting wedge for elastic drive belt

Manitou (FR)

Latest Product

0
    0
    Your Cart
    Your cart is emptyReturn to Shop