$ 0
0
$ 0
0

Bobcat 331 Excavator Service Manual (SN 511920001-511999999)

Format: PDF (Printable Document)

File Language: English

File Pages: 352

File Size: 12.23 MB (Speed Download Link)

Brand: Bobcat

Model: 331 Excavator

Book No: 6722918

Serial No: SN 511920001-511999999

Type of Document: Service Manual

Categories: ,

$ 45

Share:

Bobcat 331 Excavator Service Manual (SN 511920001-511999999)

A Bobcat 331 is a compact excavator that spends its life trenching for utilities, digging footings, loading trucks, and cleaning up tight sites. The service manual is what I grab in the yard when a 331 comes in with a weak function, an oil-soaked drive motor, or an electrical gremlin. Buyers use this manual to keep an out-of-warranty machine earning money instead of sitting on the trailer. If your serial tag falls in the listed range, this is the workshop book you use to actually fix the machine, not just run it.

What this manual helps you do

  • Diagnose hydraulic problems, check pressures with a gauge, and trace weak or dead functions on the 331.
  • Follow step-by-step teardown and reassembly for cylinders, pumps, drive motors, and swing components.
  • Trace and repair electrical faults using wiring diagrams, connector callouts, and test procedures.
  • Replace and adjust engine components, set linkages, and verify correct operation after repairs.
  • Plan and perform 50/250/500-hour services with the right procedures and inspection points for this serial range.

Who this is for

This is for a small contractor, rental fleet shop, or owner-operator who is turning wrenches on a Bobcat 331 with serial number between 511920001 and 511999999. If you just need operating tips or basic maintenance like grease points and fluid checks, you want the operator's handbook instead.

FAQ

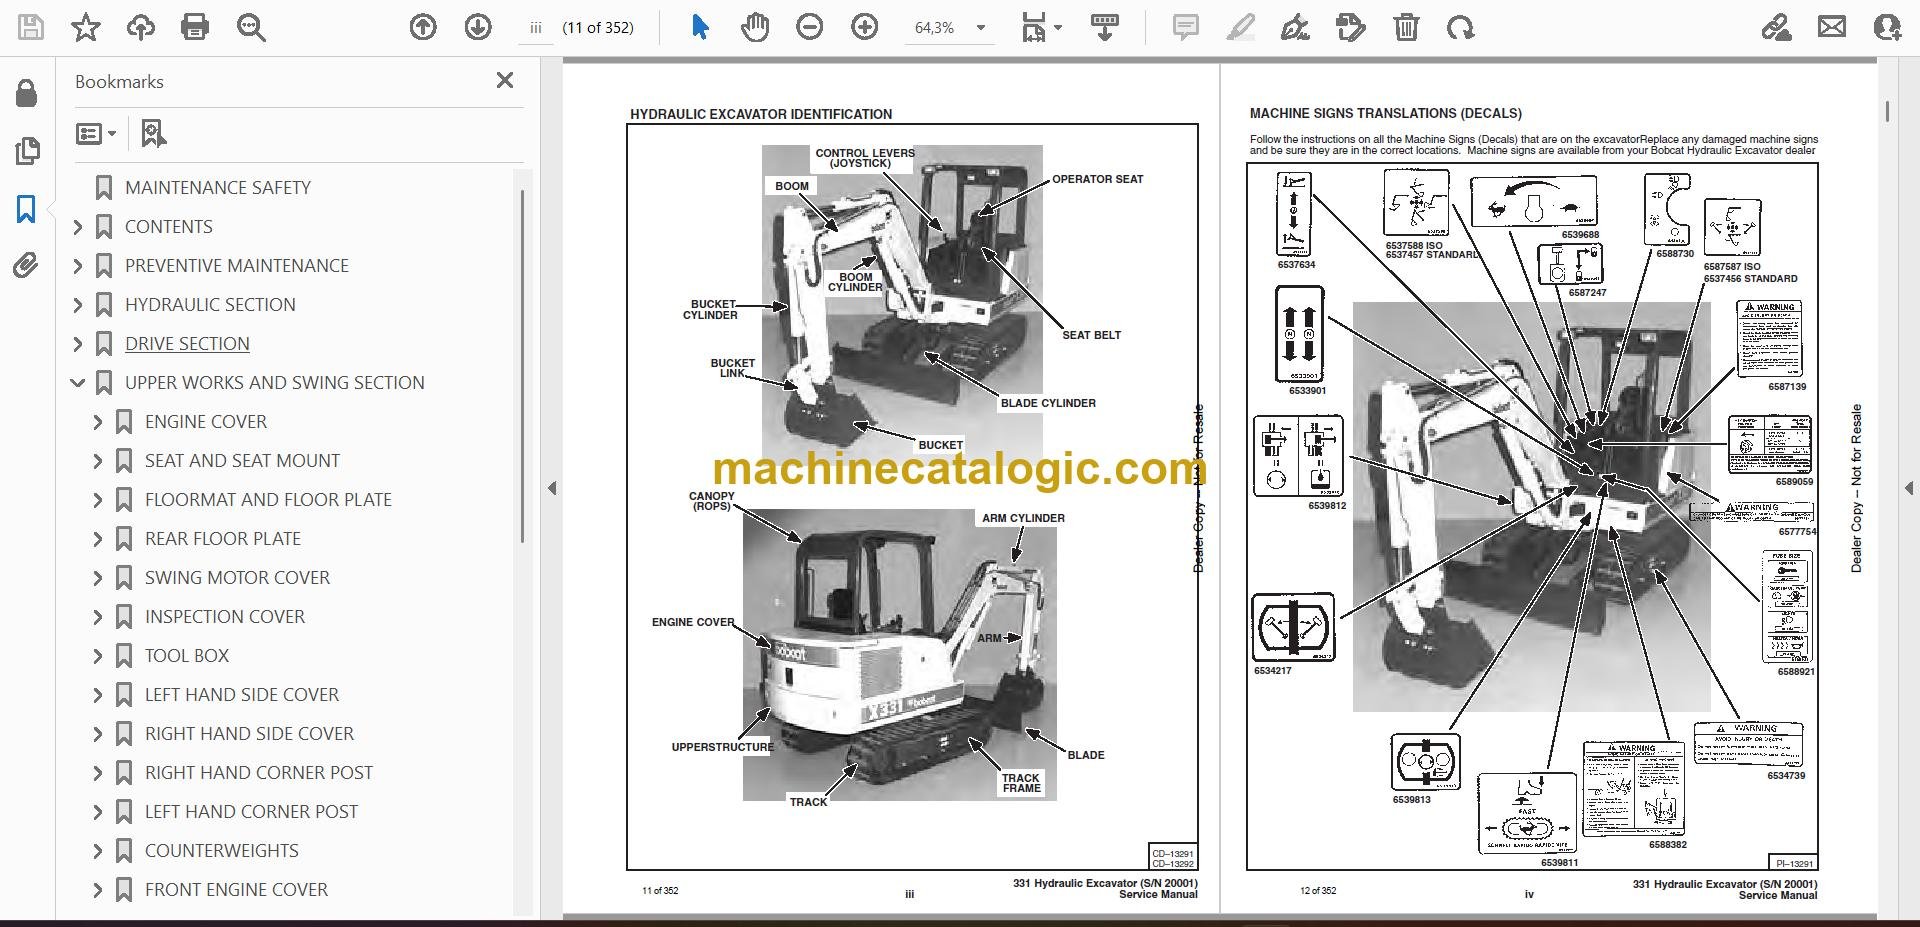
Q: Is this a searchable PDF and are the wiring diagrams readable?

A: Yes, these manuals are usually supplied as searchable PDFs, and the wiring diagrams are clear enough to zoom in and follow circuits.

Q: How do I know if it fits my exact 331?

A: Check the serial plate on your machine. If it falls between 511920001 and 511999999, this is the correct service manual.

Q: Is this the right document if I'm rebuilding or troubleshooting, not just changing oil?

A: Yes, this is the workshop-level service manual used for diagnostics and full component repairs.

If your 331's serial number is in that range and you're doing your own repairs, this is the right manual. If the serial does not match, don't buy it.

📘 Show Index

Table of Contents:

  • MAINTENANCE SAFETY
  • CONTENTS
    • FOREWORD
    • SAFETY INSTRUCTIONS
    • SERIAL NUMBER LOCATIONS
    • HYDRAULIC EXCAVATOR SERIAL NUMBER
    • ENGINE SERIAL NUMBER
    • DELIVERY REPORT
    • HYDRAULIC EXCAVATOR IDENTIFICATION
    • MACHINE SIGNS TRANSLATIONS (DECALS)
  • PREVENTIVE MAINTENANCE
    • SERVICE SCHEDULE
    • ENGINE COVER
      • Procedure
    • AIR CLEANER SERVICE
      • Replacing the Filter Element
    • FUEL SYSTEM
      • Fuel System Service
      • Fuel Filters
      • Removing Air From the Fuel System
    • ENGINE LUBRICATION SYSTEM
      • Checking The Engine Oil
      • Engine Oil and Filter Replacement
    • COOLING SYSTEM
      • Coolant Level
      • Coolant Replacement
    • HYDRAULIC SYSTEM
      • Checking and Adding Fluid
      • Replacement of the Hydraulic Filter
      • Hydraulic Reservoir
      • Diagnostic Couplers
    • USING A BOOSTER BATTERY (JUMP STARTING)
      • Procedure
    • LUBRICATION OF THE HYDRAULIC EXCAVATOR
      • Procedure
    • FINAL DRIVE CASE
      • Checking Oil Level
      • Draining Final Drive Case
  • HYDRAULIC SECTION
    • HYDRAULIC SCHEMATICS
    • HYDRAULIC SERVICE INFORMATION
      • Description
    • MAIN RELIEF VALVES
      • Checking the Dual Pressure Relief Valves at Diagnostic Couplers
      • Check the Single Pressure Relief Valve (3 Spool Valve)
      • 6 Spool Dual Pressure Relief Valve Adjustment Procedure
      • High Pressure Adjustment Procedure (6 Spool Only)
      • Low Pressure Adjustment Procedure (6 Spool Only)
      • 3 Spool Single Pressure Relief Valve Adjustment Procedure
    • HYDRAULIC PUMP
      • Checking the Hydraulic Pump
      • Removal and Installation
      • Parts Identification
      • Disassembly
      • Assembly
    • HYDRAULIC CONTROL VALVE (6 Spool)
      • Removal and Installation
      • Parts Identification
    • CONTROL VALVE (6 Spool)
      • Disassembly and Assembly
        • Disassembly
        • Assembly
        • Right Hand Travel
          • Spool Wiper and Spool Seal Installation
        • Boom, Bucket and Arm
          • Relief Valves
        • Auxiliary
          • Spool Seal and Spool Wiper Installation
        • Left Hand Travel
          • Relief Valve
          • Load Check Plug Assembly
          • Spool Seal and Spool Wiper Installation
        • End Cover–Supply and Relief Valve
        • End Cover
    • HYDRAULIC CONTROL VALVE (3 Spool)
      • Removal and Installation
      • PARTS IDENTIFICATION
    • CONTROL VALVE (3 Spool)
      • Disassembly and Assembly
        • Disassembly
        • Assembly
        • House Swing Section
        • Blade and Boom Swing Section
        • Spool Seal and Spool Wiper Installation
        • End Cover–Supply
        • End Cover
        • Pressure Build–up Valve
        • Adjustment Procedure
    • PRESSURE REDUCING VALVE WITH ACCUMULATOR
      • Removal and Installation
      • Parts Identification
    • ACCUMULATOR
      • Disassembly
      • Assembly
      • Setting the Safety Relief Valve
      • Charging
    • AUXILIARY SELECTOR VALVE
      • Removal and Installation
      • Disassembly And Assembly
    • TWO SPEED VALVE
      • Removal and Installation
      • Parts Identification
    • PORT BLOCK
      • Removal and Installation
    • OIL COOLER
      • Removal And Installation
    • HYDRAULIC RESERVOIR AND FUEL RESERVOIR
    • HYDRAULIC FILTER ASSEMBLY
      • Removal And Installation
    • BOOM CYLINDER
      • Removal And Installation
      • Parts Identification
    • ARM CYLINDER
      • Removal And Installation
      • Parts Identification
    • BUCKET CYLINDER
      • Removal And Installation
      • Parts Identification
    • BLADE CYLINDER
      • Removal And Installation
      • Parts Identification
    • BOOM SWING CYLINDER
      • Removal And Installation
      • Parts Identification
    • HYDRAULIC CYLINDER
      • Disassembly
      • Assembly
    • JOYSTICK CONTROL CHANGE
      • To change from I.S.O. to STANDARD control patterndo the following
      • To change STANDARD to I.S.O. control pattern dothe following
  • DRIVE SECTION
    • LEFT CONSOLE
      • Lockout Valve Removal and Installation
      • Cylinder Removal and Installation
      • Removal and Installation
    • LEFT JOYSTICK
      • Removal and Installation
      • Parts Identification
      • Disassembly and Assembly
    • RIGHT CONSOLE
      • Removal and Installation
    • RIGHT CONSOLE COVER
      • Removal and Installation
    • SPEED CONTROL LEVER
      • Low Idle Adjustment
      • High Idle Adjustment
      • Removal and Installation
    • BLADE CONTROL LEVER
    • STEERING LEVERS AND PEDALS
      • Removal and Installation
  • UPPER WORKS AND SWING SECTION
    • ENGINE COVER
      • Removal and Installation
    • SEAT AND SEAT MOUNT
      • Removal and Installation
    • FLOORMAT AND FLOOR PLATE
      • Removal and Installation
    • REAR FLOOR PLATE
      • Removal and Installation
    • SWING MOTOR COVER
      • Removal and Installation
    • INSPECTION COVER
      • Removal and Installation
    • TOOL BOX
      • Removal and Installation
    • LEFT HAND SIDE COVER
      • Removal and Installation
    • RIGHT HAND SIDE COVER
      • Removal and Installation
    • RIGHT HAND CORNER POST
      • Removal and Installation
    • LEFT HAND CORNER POST
      • Removal and Installation
    • COUNTERWEIGHTS
      • Removal and Installation
    • FRONT ENGINE COVER
      • Removal and Installation
    • BUCKET
      • Removal and Installation
    • BUCKET TEETH
      • Removal and Installation
    • ARM
      • Removal and Installation
    • BOOM
      • Removal and Installation
    • BOOM SWING BRACKET
      • Removal and Installation
      • Hose Installation
      • Swing Bracket Bushing Replacement
      • Bushing Removal
      • Bushing Installation
      • Boom Pivot Bushing Replacement
      • Bushing Removal
      • Bushing Installation
    • SWING MOTOR
      • Removal and Installation
      • Disassembly
      • Assembly
    • CROSS PORT RELIEF VALVE
      • Disassembly
      • Assembly
      • Description
      • Testing
    • SWING GEAR BOX ASSEMBLY
      • Parts Identification
      • Disassembly
      • Assembly
    • UPPERSTRUCTURE AND SWING CIRCLE GEAR
      • Removal and Installation
      • Removal and Installation
      • Swing Bearing Removal
      • Swing Bearing Installation
      • Alignment Pins (Threaded)
      • Alignment Pins (Not Threaded)
    • CENTER SWIVEL JOINT
      • Removal And Installation (Through Bottom Access Cover)
      • Parts Identification
    • ROPS CANOPY
      • Removal And Installation
    • CAB
      • Removal And Installation
      • Door Removal And Installation
      • Front Window Removal And Installation
      • Front Lower Glass Removal And Installation
      • Front Upper Plexiglass Removal And Installation
      • Door Glass Removal And Installation
      • Left Hand Side Glass Removal And Installation
      • Rear Glass Removal And Installation
      • Right Hand Side Glass Removal and Installation
      • Right Hand Window Assembly Removal AndInstallation
    • CAB/CANOPY REAR COVER
      • Removal And Installation
      • Installation
  • MAIN FRAME AND TRACKS
    • BLADE
      • Removal and Installation
    • TRACK TENSION
      • Adjustment
      • Rubber Tracks
      • Steel Tracks
    • TRACK
      • Removal and Installation
        • For Rubber Track:
        • For Steel Track:
    • TRACK FRAME
      • Disassembly and Assembly
    • TRACK IDLER
      • Parts Identification
      • Disassembly
      • Assembly
    • TRACK ROLLER
      • Parts Identification
      • Disassembly
      • Assembly
    • TRAVEL MOTOR
      • Removal and Installation
      • Parts Identification
    • TRAVEL MOTOR
      • Disassembly
      • Assembly
    • TRACK
      • Damage Identification and Causes
        • Cutting of the steel cords
        • Abrasion of embedded metals
        • Separation of embedded metals due to external forces
        • Separation of embedded metals due to corrosion
        • Cuts on the lug side rubber
        • Cracks of the lug side rubber due to fatigue
        • Lug abrasion
        • Cracks and cuts on the lug side rubber at the edges of the embedded metals
        • Abrasion of the track roller side rubber surface
        • Cuts on the edges of track roller side rubber
  • ELECTRICAL SYSTEM
    • ELECTRICAL SYSTEM
    • TROUBLESHOOTING
    • ELECTRICAL SYSTEM
      • Description
      • Fuses
      • Fuse Arrangement
      • Electrical System Service
    • BATTERY
      • Checking the Battery
      • Removal and Installation
    • ALTERNATOR
      • Belt Adjustment
      • Removal and Installation
    • STARTER
      • Removal and Installation
      • Disassembly and Assembly
      • Cleaning and Inspection
    • FUEL LEVEL SENDER
      • Removal and Installation
      • Checking
    • INSTRUMENT PANEL
      • Removal and Installation
    • CAB ELECTRICAL (Cab Option)
  • ENGINE SERVICE
    • TROUBLESHOOTING
    • VALVE CLEARANCE
      • Adjustment
    • ENGINE COMPRESSION
      • Checking
    • ELECTRIC FUEL PUMP
      • Removal and Installation
      • Removing Air From the Fuel System
    • FUEL FILTER
      • Removal and Installation
    • FUEL SHUT–OFF SOLENOID
      • Adjustment
    • FUEL SHUT–OFF SOLENOID
      • Removal and Installation
      • Timer Module
      • Removal and Installation
    • FUEL INJECTION PUMP
      • Checking the Injection Pump
      • Removal and Installation
      • Timing the Injection Pump
    • FUEL INJECTOR NOZZLES
      • Removal and Installation
      • Checking the Injector Nozzle
    • GLOW PLUGS
      • Removal and Installation
      • Checking the Glow Plug
    • FAN GUARD
      • Removal and Installation
    • RADIATOR
      • Removal and Installation (S/N 20001–20067)
      • Removal and Installation
      • Removal and Installation (S/N 20068 & Above)
    • AIR CLEANER
      • Removal and Installation
    • MUFFLER
      • Removal and Installation
    • ENGINE
      • Removal and Installation
    • ENGINE FLYWHEEL
      • Removal and Installation
      • Flywheel Ring Gear
    • CYLINDER HEAD
      • Removal
      • Disassembly
      • Servicing the Cylinder Head
      • Assembly
      • Installation
    • ENGINE REPAIR
      • Removing the Gearcase
      • Removing the Timing Gear, Camshaft and Oil Pump
      • Servicing the Timing Gear and Camshaft
      • Servicing the Crankshaft
      • Servicing the Cylinder Liners
      • Lubrication System
      • Oil Pump Service
      • Water Pump Service
    • ENGINE ASSEMBLY
      • Installing the Crankshaft
      • Installing the Pistons
      • Installing the Camshaft and Timing Gears
      • Installing the Gearcase
  • TECHNICAL DATA
    • HYDRAULIC EXCAVATOR SPECIFICATIONS
      • Machine Dimensions
      • Lifting Capacity
      • OPERATIONS & PERFORMANCE
      • ENGINE
      • HYDRAULIC SYSTEM
      • SWING SYSTEM
      • CYLINDER CYCLE TIMES
      • HYDRAULIC CYLINDERS
      • DRIVE SYSTEM
      • UNDERCARRIAGE
      • BRAKES
      • TRACK
      • CAPACITIES
      • DIGGING FORCE
    • ENGINE SPECIFICATIONS
      • Fuel Injection Nozzles
      • Fuel Injection Pump
      • Cylinder Head
      • Valves
      • Valve Springs
      • Rocker Arms
      • Camshaft
      • Cylinder
      • Piston Rings
      • Pistons
      • Crankshaft
      • Oil Pump
      • Engine Oil Specifications
      • Engine Bolt Torque
      • Re–Grinding The Crankshaft
    • FUEL, COOLANT AND LUBRICANTS
    • OIL SPECIFICATIONS
      • Description
    • BUCKET SPECIFICATIONS
  • SERVICE MANUAL REVISIONS
    • 331-1
    • 331-2
    • 331-3
    • 331-4

Bobcat Software

Bobcat PDF Manuals

Related Manuals

0
    0
    Your Cart
    Your cart is emptyReturn to Shop